Artifacts and models
An artifact is any data that is produced and/or consumed by functions, jobs, or pipelines.
Artifacts metadata is stored in the projects database. The main types of artifacts are:
Files — files, directories, images, figures, and plotlines.
Datasets — any data , such as tables and DataFrames.
Models — all trained models.
Feature Store Objects - Feature Sets and Feature Vectors
IN this section
Artifacts and versioning
Artifacts can be viewed and managed in the UI. In the project page, select the artifact type
models, files, or feature-store (for datasets and feature store objects).
Example dataset artifact screen:
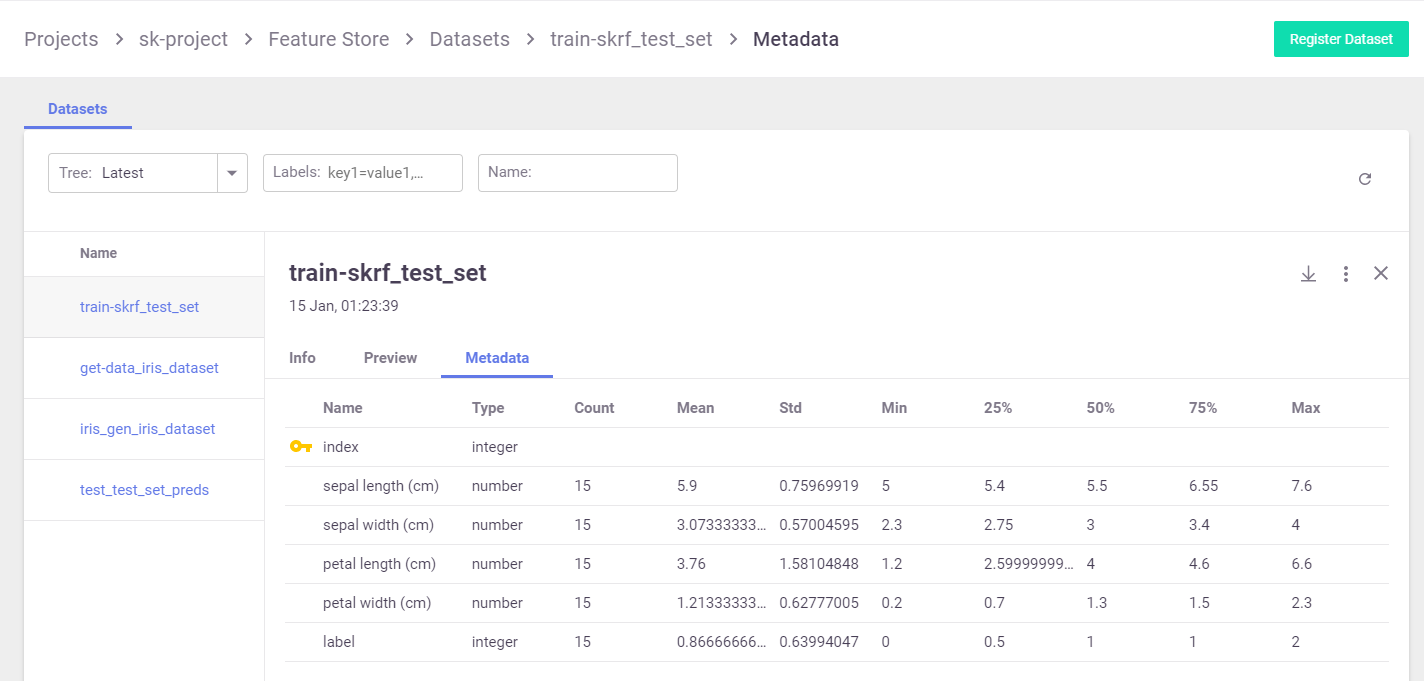
You can search the artifacts based on time and labels. For each artifact, you can view its location, the artifact type, labels, the producer of the artifact, the artifact owner, last update date, and type-specific information.
Artifacts can also be viewed from the job page (in the artifacts tab).
For each artifact, you can view its content as well as download the artifact.
Artifact Path
Jobs use the default or job specific artifact_path parameter to determine where the artifacts are stored.
The default artifact_path can be specified at the cluster level, client level, project level, or job level
(at that precedence order), or can be specified as a parameter in the specific log operation.
You can set the default artifact_path for your environment using the set_environment() function.
You can override the default artifact_path configuration by setting the artifact_path parameter of
the set_environment() function. You can use variables in the artifacts path,
such as {{project}} for the name of the running project or {{run.uid}} for the current job/pipeline run UID.
(The default artifacts path uses {{project}}.) The following example configures the artifacts path to an
artifacts directory in the current active directory (./artifacts)
set_environment(project=project_name, artifact_path='./artifacts')
For Iguazio MLOps Platform users
In the platform, the default artifacts path is a /v3io/projects/<project name>/artifacts
(for example, /v3io/projects/myproject/artifacts for a “myproject” project).
Saving the Artifacts in Run-Specific Paths
When you specify {{run.uid}}, the artifacts for each job are stored in a dedicated directory for each executed job.
Under the artifact path you should see the source-data file in a new directory whose name is derived from the unique run ID.
Otherwise, the same artifacts directory is used in all runs, and the artifacts for newer runs override those from the previous runs.
As previously explained, set_environment returns a tuple with the project name and artifacts path.
You can optionally save your environment’s artifacts path to a variable, as demonstrated in the previous steps.
You can then use the artifacts-path variable to extract paths to task-specific artifact subdirectories.
For example, the following code extracts the path to the artifacts directory of a training task, and saves the path
to a training_artifacts variable:
from os import path
training_artifacts = path.join(artifact_path, 'training')
Note
The artifacts path uses data store URLs which are not necessarily local file paths
(for example, s3://bucket/path). Be careful not to use such paths with general file utilities.
Artifact URIs, Metadata and Versioning
Artifacts have unique URIs in the form store://<type>/<project>/<key/path>[:tag].
The URI is automatically generated by log_artifact and can be used as input to jobs, functions, pipelines, etc..
Artifacts are versioned. Each unique version has a unique IDs (uid) and can have a tag label.
When the tag is not specified, it uses the latest version.
Artifact metadata and objects can be accessed through the SDK or downloaded from the UI (as YAML files). They host common and object specific metadata such as:
Common metadata: name, project, updated, version info
How they were produced (user, job, pipeline, etc.)
Lineage data (sources used to produce that artifact)
Information about formats, schema, sample data
Links to other artifacts (e.g. a model can point to a chart)
Type-specific attributes
Artifacts can be obtained via the SDK through type specific APIs or using generic artifact APIs such as:
get_dataitem()- get theDataItemobject for reading/downloading the artifact contentget_store_resource()- get the artifact object
Example artifact URLs:
store://artifacts/default/my-table
store://artifacts/sk-project/train-model:e95f757e-7959-4d66-b500-9f6cdb1f0bc7
store://feature-sets/stocks/quotes:v2
store://feature-vectors/stocks/enriched-ticker
File and dir artifacts
Dataset artifacts
Storing datasets is important in order to have a record of the data that was used to train the model, as well as storing any processed data. MLRun comes with built-in support for the DataFrame format. MLRun not only stores the DataFrame, but it also provides information about the data, such as statistics.
The simplest way to store a dataset is with the following code:
context.log_dataset(key='my_data', df=df)
Where key is the the name of the artifact and df is the DataFrame. By default, MLRun stores a short preview of 20 lines. You can change the number of lines by changing the value of the preview parameter.
MLRun also calculates statistics on the DataFrame on all numeric fields. You can enable statistics regardless to the DataFrame size by setting the stats parameter to True.
Logging a Dataset From a Job
The following example shows how to work with datasets from a job:
from os import path
from mlrun.execution import MLClientCtx
from mlrun.datastore import DataItem

# Ingest a data set into the platform
def get_data(context: MLClientCtx, source_url: DataItem, format: str = 'csv'):

    iris_dataset = source_url.as_df()

    target_path = path.join(context.artifact_path, 'data')
    # Optionally print data to your logger
    context.logger.info('Saving Iris data set to {} ...'.format(target_path))

    # Store the data set in your artifacts database
    context.log_dataset('iris_dataset', df=iris_dataset, format=format,
                        index=False, artifact_path=target_path)
You can run this function locally or as a job. For example, to run it locally:
from os import path
from mlrun import new_project, run_local, mlconf

project_name = 'my-project'
project_path = path.abspath('conf')
project = new_project(project_name, project_path, init_git=True)

# Target location for storing pipeline artifacts
artifact_path = path.abspath('jobs')
# MLRun DB path or API service URL
mlconf.dbpath = mlconf.dbpath or 'http://mlrun-api:8080'

source_url = 'https://s3.wasabisys.com/iguazio/data/iris/iris_dataset.csv'
# Run get-data function locally
get_data_run = run_local(name='get_data',
                         handler=get_data,
                         inputs={'source_url': source_url},
                         project=project_name,
                         artifact_path=artifact_path)
The dataset location is returned in the outputs field, therefore you can get the location by calling get_data_run.artifact('iris_dataset') to get the dataset itself.
# Read your data set
get_data_run.artifact('iris_dataset').as_df()

# Visualize an artifact in Jupyter (image, html, df, ..)
get_data_run.artifact('confusion-matrix').show()
Call dataset.meta.stats to obtain the data statistics. You can also get the data as a Pandas Dataframe by calling the dataset.as_df().
Model artifacts
An essential piece of artifact management and versioning is storing a model version. This allows users to experiment with different models and compare their performance, without having to worry about losing their previous results.
The simplest way to store a model named my_model is with the following code:
from pickle import dumps
model_data = dumps(model)
context.log_model(key='my_model', body=model_data, model_file='my_model.pkl')
You can also store any related metrics by providing a dictionary in the metrics parameter, such as metrics={'accuracy': 0.9}. Furthermore, any additional data that you would like to store along with the model can be specified in the extra_data parameter. For example extra_data={'confusion': confusion.target_path}
A convenient utility method, eval_model_v2, which calculates mode metrics is available in mlrun.utils.
See example below for a simple model trained using scikit-learn (normally, you would send the data as input to the function). The last 2 lines evaluate the model and log the model.
from sklearn import linear_model
from sklearn import datasets
from sklearn.model_selection import train_test_split
from pickle import dumps

from mlrun.execution import MLClientCtx
from mlrun.mlutils import eval_model_v2

def train_iris(context: MLClientCtx):

    # Basic scikit-learn iris SVM model
    X, y = datasets.load_iris(return_X_y=True)
    X_train, X_test, y_train, y_test = train_test_split(
        X, y, test_size=0.2, random_state=42)
    model = linear_model.LogisticRegression(max_iter=10000)
    model.fit(X_train, y_train)

    # Evaluate model results and get the evaluation metrics
    eval_metrics = eval_model_v2(context, X_test, y_test, model)

    # Log model
    context.log_model("model",
                      body=dumps(model),
                      artifact_path=context.artifact_subpath("models"),
                      extra_data=eval_metrics,
                      model_file="model.pkl",
                      metrics=context.results,
                      labels={"class": "sklearn.linear_model.LogisticRegression"})
Save the code above to train_iris.py. The following code loads the function and runs it as a job. See the quick-start page to learn how to create the project and set the artifact path.
from mlrun import code_to_function

gen_func = code_to_function(name='train_iris',
                            filename='train_iris.py',
                            handler='train_iris',
                            kind='job',
                            image='mlrun/ml-models')

train_iris_func = project.set_function(gen_func).apply(auto_mount())

train_iris = train_iris_func.run(name='train_iris',
                                 handler='train_iris',
                                 artifact_path=artifact_path)
You can now use get_model to read the model and run it. This function will get the model file, metadata, and extra data. The input can be either the path of the model, or the directory where the model resides. If you provide a directory, the function will search for the model file (by default it searches for .pkl files)
The following example gets the model from models_path and test data in test_set with the expected label provided as a column of the test data. The name of the column containing the expected label is provided in label_column. The example then retrieves the models, runs the model with the test data and updates the model with the metrics and results of the test data.
from pickle import load

from mlrun.execution import MLClientCtx
from mlrun.datastore import DataItem
from mlrun.artifacts import get_model, update_model
from mlrun.mlutils import eval_model_v2

def test_model(context: MLClientCtx,
               models_path: DataItem,
               test_set: DataItem,
               label_column: str):

    if models_path is None:
        models_path = context.artifact_subpath("models")
    xtest = test_set.as_df()
    ytest = xtest.pop(label_column)

    model_file, model_obj, _ = get_model(models_path)
    model = load(open(model_file, 'rb'))

    extra_data = eval_model_v2(context, xtest, ytest.values, model)
    update_model(model_artifact=model_obj, extra_data=extra_data,
                 metrics=context.results, key_prefix='validation-')
To run the code, place the code above in test_model.py and use the following snippet. The model from the previous step is provided as the models_path:
from mlrun.platforms import auto_mount
gen_func = code_to_function(name='test_model',
                            filename='test_model.py',
                            handler='test_model',
                            kind='job',
                            image='mlrun/ml-models')

func = project.set_function(gen_func).apply(auto_mount())

run = func.run(name='test_model',
                handler='test_model',
                params={'label_column': 'label'},
                inputs={'models_path': train_iris.outputs['model'],
                        'test_set': 'https://s3.wasabisys.com/iguazio/data/iris/iris_dataset.csv'}),
                artifact_path=artifact_path)
Plot artifacts
Storing plots is useful to visualize the data and to show any information regarding the model performance. For example, you can store scatter plots, histograms and cross-correlation of the data, and for the model store the ROC curve and confusion matrix.
The following code creates a confusion matrix plot using sklearn.metrics.plot_confusion_matrix and stores the plot in the artifact repository:
from mlrun.artifacts import PlotArtifact
from mlrun.mlutils import gcf_clear

gcf_clear(plt)
confusion_matrix = metrics.plot_confusion_matrix(model,
                                                 xtest,
                                                 ytest,
                                                 normalize='all',
                                                 values_format = '.2g',
                                                 cmap=plt.cm.Blues)
confusion_matrix = context.log_artifact(PlotArtifact('confusion-matrix', body=confusion_matrix.figure_),
                                        local_path='plots/confusion_matrix.html')
You can use the update_dataset_meta function to associate the plot with the dataset by assigning the value of the extra_data parameter:
from mlrun.artifacts import update_dataset_meta

extra_data = {'confusion_matrix': confusion_matrix}
update_dataset_meta(dataset, extra_data=extra_data)