Part 1: MLRun Basics
Part 1 of the getting-started tutorial introduces you to the basics of working with functions by using the MLRun open-source MLOps orchestration framework.
The tutorial takes you through the following steps:
By the end of this tutorial you’ll learn how to
Create a basic data-preparation MLRun function.
Store data artifacts to be used and managed in a central database.
Run your code on a distributed Kubernetes cluster without any DevOps overhead.
Schedule jobs to run on the cluster.
Using MLRun Remotely
This tutorial is aimed at running your project from a local Jupyter Notebook service in the same environment in which MLRun is installed and running. However, as a developer you might want to develop your project from a remote location using your own IDE (such as a local Jupyter Notebook or PyCharm), and connect to the MLRun environment remotely. To learn how to use MLRun from a remote IDE, see Setting a Remote Environment.
Introduction to MLRun
MLRun is an open-source MLOps framework that enables faster development of production ready ML applications from data ingestion/preparation, model development to deployment of operational and real-time production pipelines.
MLRun offers a convenient abstraction layer and automation on top of powerful serverless technologies for feature engineering, machine learning, and deep learning. MLRun provides the following key benefits:
Rapid deployment of code to production pipelines
Elastic scaling of batch and real-time workloads
Feature management — ingestion, preparation, and monitoring
Works anywhere — your local IDE, multi-cloud, or on-prem
MLRun can be installed over Kubernetes or is preinstalled as a managed service in the Iguazio MLOps Platform.
▶ For more detailed information, see the MLRun Serverless Functions & Job Submission documentation.
Step 1: Installation and Setup
For information on how to install and configure MLRun over Kubernetes, see the MLRun installation guide.
To install the MLRun package, run pip install mlrun with the MLRun version that matches your MLRun service.
For Iguazio MLOps Platform Users
If your are using the Iguazio MLOps Platform, MLRun is available as a default (pre-deployed) shared service.
You can run !/User/align_mlrun.sh to install the MLRun package or upgrade the version of an installed package.
By default, the script attempts to download the latest version of the MLRun Python package that matches the version of the running MLRun service.
Kernel Restart
After installing or updating the MLRun package, restart the notebook kernel in your environment!
Initializing Your MLRun Environment
MLRun objects (runs, functions, workflows, features, artifacts, models, etc.) are associated with a project namespace.
Projects can be stored or loaded from git repositories and can be created via API/UI.
For more information about MLRun projects, see the MLRun projects documentation.
Use the get_or_create_project MLRun method to create a new project, or fetch it from the DB/repository if it already exists.
This method returns an MLRun project object.
Set the method’s name parameter to your selected project name and set the context to the directory path hosting the project files/code (example: ./).
You can also optionally set the user_project parameter to True to automatically append the username of the running user to the project name specified in the project parameter, resulting in a <project>-<username> project name;
this is useful for avoiding project-name conflicts among different users.
You can optionally pass additional parameters to get_or_create_project, as detailed in the MLRun API reference.
For example, you can set the url parameter to specify a remote git url (hosting the project code). In Part 4 of this tutorial you’ll learn how project objects enable packaging, pipeline composition, and simple integration with git and CI/CD frameworks.
Run the following code to initialize your MLRun environment to use a “getting-started-tutorial-<username>” project and store the project artifacts in the default artifacts path:
from os import path
import mlrun

# Set the base project name
project_name_base = 'getting-started'

# Initialize the MLRun project object
project = mlrun.get_or_create_project(project_name_base, context="./", user_project=True)

# Display the current project name
project_name = project.metadata.name
print(f'Full project name: {project_name}')
> 2022-02-06 21:58:06,320 [warning] Failed resolving version info. Ignoring and using defaults
> 2022-02-06 21:58:13,183 [warning] Server or client version is unstable. Assuming compatible: {'server_version': '0.0.0+unstable', 'client_version': '0.0.0+unstable'}
> 2022-02-06 21:58:13,217 [info] loaded project getting-started from MLRun DB
Full project name: getting-started-admin
Step 2: Creating a Basic Function
This step introduces you to MLRun functions and artifacts and walks you through the process of converting a local function to an MLRun function.
Defining a Local Function
The following example code defines a data-preparation function (prep_data) that reads (ingests) a CSV file from the provided source URL into a pandas DataFrame. It
prepares (“cleans”) the data by changing the type of the categorical data in the specified label column,
and returns the DataFrame and its length.
import pandas as pd

# Fetch and clean a dataset through ingestion
def prep_data(source_url, label_column):
    df = pd.read_csv(source_url)
    df[label_column] = df[label_column].astype('category').cat.codes
    return df, df.shape[0]
Creating and Running Your First MLRun Function
MLRun Functions
The MLRun jobs and pipelines run over serverless functions. These functions can include the function code and specification (“spec”). The spec contains metadata for configuring related operational aspects, such as the image, required packages, CPU/memory/GPU resources, storage, and the environment. The different serverless runtime engines automatically transform the function code and spec into fully managed and elastic services that run over Kubernetes. Functions are versioned and can be generated from code or notebooks, or loaded from a marketplace.
MLRun supports batch functions (for data processing, training, etc.) or real-time functions (for serving, APIs, and stream processing).
To work with functions you need to be familiar with the following function components:
Context — Functions can be built from standard code files or function handlers. To gain the maximum value we use the job
contextobject inside our code. This provides access to parameters, data, secrets, etc., as well as log text, files, artifacts, and labels.If
contextis specified as the first parameter in the function signature, MLRun injects the current job context into it.Alternatively, you can obtain the context object using the MLRun
get_or_create_ctx()method, without changing the function.
Parameters and inputs — You can pass
parameters(arguments) or datainputs(such as datasets, feature-vectors, models, or files) to the functions through therunmethod.Inside the function you can access the parameters/inputs by simply adding them as parameters to the function or you can get them from the context object (using
get_param()andget_input()).You can use MLRun Iterative Hyper-Param jobs to run functions with different parameter and input combinations.
Various data objects (files, tables, models, etc.) are passed to the function as
DataItemobjects. Data items objects abstract away the data backend implementation, provide a set of convenience methods (.as_df,.get,.show, ..), and enable auto logging/versioning of data and metadata.
For more information see the following MLRun documentation:
MLRun Function Code
The step redefines this function and converts it to an MLRun function that leverages MLRun:
Read the data
Log the data to the MLRun database
The MLRun function has the following parameter changes compared to the original local function:
To effectively run your code in MLRun, you need to add a
contextparameter to your function (or alternatively, get the context by usingget_or_create_ctx()). This allows you to log and retrieve information related to the function’s execution.The tutorial example sets the
source_urlparameter tomlrun.DataItemto send a data item as input when the function is called (using theinputsparameter).
The following code demonstrates how to redefine your local data-preparation function to make it compatible with MLRun, and then convert the local notebook code into an MLRun function.
This example tutorial function code works as follows:
Prepare (clean) the data in the same way as in the local-function implementation in the previous step.
Obtain a pandas DataFrame from the
source_urldata item by calling theas_dfmethod.Record the data length (number of rows) using the
log_resultmethod. This method records (logs) the values of standard function variables (for example, int, float, string, and list).Log the data-set artifact using the
log_datasetmethod. This method saves and logs function data items and related metadata (logs function artifacts).
# mlrun: start-code
import mlrun
def prep_data(context, source_url: mlrun.DataItem, label_column='label'):

    # Convert the DataItem to a pandas DataFrame
    df = source_url.as_df()
    df[label_column] = df[label_column].astype('category').cat.codes

    # Log the DataFrame size after the run
    context.log_result('num_rows', df.shape[0])

    # Store the dataset in your artifacts database
    context.log_dataset('cleaned_data', df=df, index=False, format='csv')
# mlrun: end-code
Converting the Notebook Code to a Function
MLRun annotations are used to identify the code that needs to be converted into an MLRun function. They provide non-intrusive hints that indicate which parts of your notebook are the code of the function.
The
# mlrun: ignoreannotation identifies code that is not included in the MLRun function (such as prints, plots, tests, and debug code).The
# mlrun: start-codeand# mlrun: end-codeannotations identify code to be converted to an MLRun function: everything before thestart-codeannotation and after theend-codeannotation is ignored, and only code between these two annotations is converted. These annotations are used in the tutorial notebook instead of adding theignoreannotation to all cells that shouldn’t be converted.
For more information on how to use MLRun code annotations, see converting notebook code to a function.
The following code uses the code_to_function MLRun method to convert your local prep_data function code to a data_prep_func MLRun function.
If the filename parameter is not specified it searches the code in the current notebook. Alternatively you can specify a path to a .py or .ipynb file by setting the filename parameter.
The kind parameter of the code_to_function method determines the engine for running the code.
MLRun allows running function code using different engines, such as Python, Spark, MPI, Nuclio, and Dask.
The following example sets the kind parameter to job in order to run the code as a Python process (“job”).
# Convert the local prep_data function to an MLRun project function
data_prep_func = mlrun.code_to_function(name='prep_data', kind='job', image='mlrun/mlrun')
Using custom packages or code from a source repository
This tutorial uses the built-in mlrun images (mlrun/mlrun). You can also build custom function containers dynamically and include user specified packages or code from a repository. You can set advanced build attributes using the function.build_config() method or simply specify package requirements in the code_to_function() call.
To build the function container from the specified requirements, run function.deploy(), which creates a custom container for the function. Once the function is built you can run it.
Running the MLRun Function Locally
Now you’re ready to run your MLRun function (data_prep_func).
This example uses the run MLRun method and sets its local parameter to True to run the function code locally within your Jupyter pod. This means that the function uses the environment variables, volumes, and image that are running in this pod.
Note: When running a function locally, the function code is saved only in a temporary local directory and not in your project’s ML functions code repository. In the next step of this tutorial you’ll run the function on a cluster, which automatically saves the function object in the project.
The execution results are stored in the MLRun database. The tutorial example sets the following function parameters:
name—the job namehandler—the name of the function handlerinputs—the data-set URL
The example uses a CSV file from MLRun demo data repository The default location is in the Wasabi object-store service).
You can also use the function to ingest data in formats other than CSV, such as Parquet, without modifying the code.
training a model in an air-gapped site
If you are working in MLRun:
Download your data file and save it locally.
Run:
import osos.environ["env_name"] = 1Use the same command for the sample data set path, for example:
source_url = mlrun.get_sample_path("data/iris/iris_dataset.csv")
If your system is integrated with an MLOps Platform:
Download your data file and save it locally.
In the UI, click the settings icon (
 ) in the top-right of the header in any page to open the Settings dialog.
Click Environment variables | Create a new environment variable, and set an environmental variable: SAMPLE_DATA_SOURCE_URL_PREFIX = the relative path to locally-stored data. For example:
/v3io/bigdata/path/...Use the same command for the sample data set path, for example:
source_url = mlrun.get_sample_path("data/iris/iris_dataset.csv")
# Set the source-data URL
source_url = mlrun.get_sample_path("data/iris/iris.data.raw.csv")
# Run the `data_prep_func` MLRun function locally
prep_data_run = data_prep_func.run(name='prep_data',
                                   handler=prep_data,
                                   inputs={'source_url': source_url},
                                   local=True)
> 2022-02-06 22:01:18,436 [info] starting run prep_data uid=0872125626964b3f99089df8bf928ff3 DB=http://mlrun-api:8080
| project | uid | iter | start | state | name | labels | inputs | parameters | results | artifacts |
|---|---|---|---|---|---|---|---|---|---|---|
| getting-started-admin | 0 | Feb 06 22:01:18 | completed | prep_data | v3io_user=admin kind= owner=admin host=jupyter-b7945bb6c-zv48d |
source_url |
num_rows=150 |
cleaned_data |
> 2022-02-06 22:01:18,912 [info] run executed, status=completed
Getting Information About the Run Object
Every run object that’s returned by the MLRun run method has the following methods:
uid— returns the unique ID.state— returns the last known state.show— shows the latest job state and data in a visual widget (with hyperlinks and hints).outputs— returns a dictionary of the run results and artifact paths.logs— returns the latest logs. UseWatch=Falseto disable the interactive mode in running jobs.artifact— returns full artifact details for the provided key.output— returns a specific result or an artifact path for the provided key.to_dict,to_yaml,to_json— converts the run object to a dictionary, YAML, or JSON format (respectively).
# example
prep_data_run.state()
'completed'
# example
prep_data_run.outputs['cleaned_data']
'store://artifacts/getting-started-admin/prep_data_cleaned_data:0872125626964b3f99089df8bf928ff3'
Reading the Output
The data-set location is returned in the outputs field.
Therefore, you can get the location by calling prep_data_run.outputs['cleaned_data'] and using run.get_dataitem to get the data set itself.
dataset = prep_data_run.artifact('cleaned_data').as_df()
dataset.head()
| sepal length (cm) | sepal width (cm) | petal length (cm) | petal width (cm) | label | |
|---|---|---|---|---|---|
| 0 | 5.1 | 3.5 | 1.4 | 0.2 | 0 |
| 1 | 4.9 | 3.0 | 1.4 | 0.2 | 0 |
| 2 | 4.7 | 3.2 | 1.3 | 0.2 | 0 |
| 3 | 4.6 | 3.1 | 1.5 | 0.2 | 0 |
| 4 | 5.0 | 3.6 | 1.4 | 0.2 | 0 |
Saving the Artifacts in Run-Specific Paths
In the previous steps, each time the function was executed its artifacts were saved to the same directory, overwriting the existing artifacts in this directory.
However, you can also select to save the run results (source-data file) to a different directory for each job execution.
This is done by setting the artifact path and using the unique run-ID parameter ({{run.uid}}) in the path.
Under the artifact path you should be able to see the source-data file in a new directory whose name is derived from the unique run ID.
prep_data_run = data_prep_func.run(name='prep_data',
                         handler=prep_data,
                         inputs={'source_url': source_url},
                         local=True,
                         artifact_path=path.join(mlrun.mlconf.artifact_path, '{{run.uid}}'))
> 2022-02-06 22:02:55,268 [info] starting run prep_data uid=0480c2b438da4bf7a84f3acee45c5546 DB=http://mlrun-api:8080
| project | uid | iter | start | state | name | labels | inputs | parameters | results | artifacts |
|---|---|---|---|---|---|---|---|---|---|---|
| getting-started-admin | 0 | Feb 06 22:02:55 | completed | prep_data | v3io_user=admin kind= owner=admin host=jupyter-b7945bb6c-zv48d |
source_url |
num_rows=150 |
cleaned_data |
> 2022-02-06 22:02:55,610 [info] run executed, status=completed
Step 3: Running the Function on a Cluster
You can also run MLRun functions on the cluster itself, as opposed to running them locally, like in the previous steps.
Running a function on the cluster allows you to leverage the cluster’s resources and run more resource-intensive workloads.
MLRun helps you to easily run your code without the hassle of creating configuration files and build images.
To run an MLRun function on a cluster, change the run method’s local flag to False.
prep_data_run = data_prep_func.run(name='prep_data',
                                   handler='prep_data',
                                   inputs={'source_url': source_url},
                                   local=False)
> 2022-02-06 22:04:07,284 [info] starting run prep_data uid=24ecd12a877545eea35acd90910ae2b8 DB=http://mlrun-api:8080
> 2022-02-06 22:04:07,445 [info] Job is running in the background, pod: prep-data-5cdzz
> 2022-02-06 22:04:10,690 [warning] Server or client version is unstable. Assuming compatible: {'server_version': '0.0.0+unstable', 'client_version': '0.0.0+unstable'}
> 2022-02-06 22:04:10,987 [info] run executed, status=completed
final state: completed
| project | uid | iter | start | state | name | labels | inputs | parameters | results | artifacts |
|---|---|---|---|---|---|---|---|---|---|---|
| getting-started-admin | 0 | Feb 06 22:04:10 | completed | prep_data | v3io_user=admin kind=job owner=admin host=prep-data-5cdzz |
source_url |
num_rows=150 |
cleaned_data |
> 2022-02-06 22:04:13,663 [info] run executed, status=completed
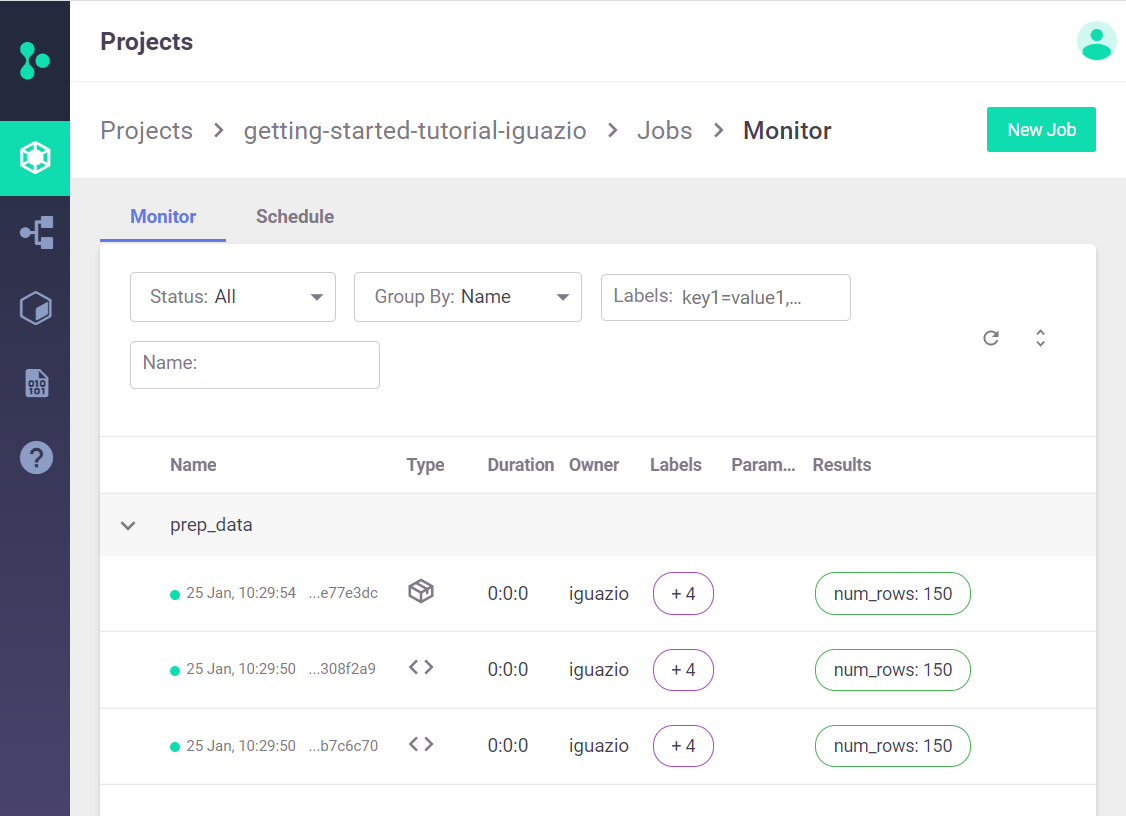
Step 4: Viewing Jobs on the Dashboard (UI)
On the Projects dashboard page, select your project and then navigate to the project’s jobs and workflow page by selecting the relevant link. For this tutorial, after running the prep_data method twice, you should see three records with types local (<>) and job.
In this view you can track all jobs running in your project and view detailed job information.
Select a job name to display tabs with additional information such as an input data set, artifacts that were generated by the job, and execution results and logs.
Step 5: Scheduling Jobs
To schedule a job, you can set the schedule parameter of the run method.
The scheduling is done by using a crontab format.
You can also schedule jobs from the dashboard. On the Projects > Jobs and Workflows page, you can create a new job using the New Job wizard. At the end of the wizard you can set the job scheduling. In the following example, the job is set to run every 30 minutes.
data_prep_func
prep_data_run = data_prep_func.run(name='prep_data',
                                   handler='prep_data',
                                   inputs={'source_url': source_url},
                                   local=False,
                                   schedule='*/30 * * * *')
> 2022-02-06 22:04:26,151 [info] starting run prep_data uid=1371ba389bbf4a4dad91a072762c95b6 DB=http://mlrun-api:8080
> 2022-02-06 22:04:26,358 [info] task scheduled, {'schedule': '*/30 * * * *', 'project': 'getting-started-admin', 'name': 'prep_data'}
View Scheduled Jobs on the Dashboard (UI)
You can also see your scheduled jobs on your project’s Jobs | Schedule dashboard page.

Deleting Scheduled Jobs
When you no longer need to run the scheduled jobs, remove them in the UI or by using the get_run_db().delete_schedule MLRun method to delete the job-schedule objects that you created.
mlrun.get_run_db().delete_schedule(project_name, 'prep_data')
Done!
Congratulation! You’ve completed Part 1 of the MLRun getting-started tutorial. Proceed to Part 2: Model Training to learn how to train an ML model.