Kubernetes runtime
Contents
Kubernetes runtime#
This topic describes running a kubernetes-based job using shared data, and building custom container images.
In this section
Define a new function and its dependencies#
Define a single serverless function with two handlers, one for training and one for validation.
import mlrun
> 2021-01-24 00:04:38,841 [warning] Failed resolving version info. Ignoring and using defaults
> 2021-01-24 00:04:40,691 [warning] Unable to parse server or client version. Assuming compatible: {'server_version': 'unstable', 'client_version': 'unstable'}
import time
import pandas as pd
from mlrun.artifacts import get_model, update_model

def training(
    context,
    p1: int = 1,
    p2: int = 2
) -> None:
    """Train a model.

    :param context: The runtime context object.
    :param p1: A model parameter.
    :param p2: Another model parameter.
    """
    # access input metadata, values, and inputs
    print(f'Run: {context.name} (uid={context.uid})')
    print(f'Params: p1={p1}, p2={p2}')
    context.logger.info('started training')

    # <insert training code here>

    # log the run results (scalar values)
    context.log_result('accuracy', p1 * 2)
    context.log_result('loss', p1 * 3)

    # add a label/tag to this run
    context.set_label('category', 'tests')

    # log a simple artifact + label the artifact
    # If you want to upload a local file to the artifact repo add src_path=<local-path>
    context.log_artifact('somefile',
                          body=b'abc is 123',
                          local_path='myfile.txt')

    # create a dataframe artifact
    df = pd.DataFrame([{'A':10, 'B':100}, {'A':11,'B':110}, {'A':12,'B':120}])
    context.log_dataset('mydf', df=df)

    # Log an ML Model artifact, add metrics, params, and labels to it
    # and place it in a subdir ('models') under artifacts path
    context.log_model('mymodel', body=b'abc is 123',
                      model_file='model.txt',
                      metrics={'accuracy':0.85}, parameters={'xx':'abc'},
                      labels={'framework': 'xgboost'},
                      artifact_path=context.artifact_subpath('models'))
def validation(
    context,
    model: mlrun.DataItem
) -> None:
    """Model validation.

    Dummy validation function.

    :param context: The runtime context object.
    :param model: The extimated model object.
    """
    # access input metadata, values, files, and secrets (passwords)
    print(f'Run: {context.name} (uid={context.uid})')
    context.logger.info('started validation')

    # get the model file, class (metadata), and extra_data (dict of key: DataItem)
    model_file, model_obj, _ = get_model(model)

    # update model object elements and data
    update_model(model_obj, parameters={'one_more': 5})

    print(f'path to local copy of model file - {model_file}')
    print('parameters:', model_obj.parameters)
    print('metrics:', model_obj.metrics)
    context.log_artifact('validation',
                         body=b'<b> validated </b>',
                         format='html')
The following end-code annotation tells MLRun to stop parsing the notebook from this cell. Do not remove this cell:
# mlrun: end-code
Convert the code to a serverless job#
Create a function that defines the runtime environment (type, code, image, …) and run() a job or experiment using that function.
In each run, you can specify the function, inputs, parameters/hyper-parameters, etc.
Use the job runtime for running container jobs, or alternatively use another distributed runner like MpiJob, Spark, Dask, and Nuclio.
Setting up the environment
project_name, artifact_path = mlrun.set_environment(project='jobs-demo', artifact_path='./data/{{run.uid}}')
Define the cluster jobs, build images, and set dependencies#
To use the function in a cluster you need to package the code and its dependencies.
The code_to_function call automatically generates a function object from the current notebook (or specified file) with its list of dependencies and runtime configuration. In this example the code depends on the pandas package, so it’s specified in the code_to_function call.
# create an ML function from the notebook, attach it to iguazio data fabric (v3io)
trainer = mlrun.code_to_function(name='my-trainer', kind='job', image='mlrun/mlrun', requirements=['pandas'])
The functions need a shared storage media (file or object) to pass and store artifacts.
You can add Kubernetes resources like volumes, environment variables, secrets, cpu/mem/gpu, etc. to a function.
mlrun uses KubeFlow modifiers (apply) to configure resources. You can build your own resources or use predefined resources e.g. AWS resources.
The example above uses built-in images. When you move to production, use specific tags. For more details on built-in and custom images, see MLRun images and external docker images.
Option 1: Using file volumes for artifacts#
MLRun automatically applies the most common storage configuration to functions. As a result, most cases do not require any additional storage configurations before executing a function. See more details in Attach storage to functions.
If you’re using the Iguazio MLOps platform, and want to configure manually, use the mount_v3io() auto-mount modifier.
If you’re using another k8s PVC volume, use the mlrun.platforms.mount_pvc(..) modifier with the required parameters.
This example uses the auto_mount() modifier. It auto-selects between the k8s PVC volume and the Iguazio data fabric. You can set the PVC volume configuration with the env var below or with the auto_mount params:
MLRUN_PVC_MOUNT=<pvc-name>:<mount-path>
If you apply mount_v3io() or auto_mount() when running the function in the MLOps platform, it attaches the function to Iguazio’s real-time data fabric (mounted by default to home of the current user).
Note: If the notebook is not on the managed platform (it’s running remotely) you might need to use secrets.
For the current training function, run:
# for PVC volumes set the env var for PVC: MLRUN_PVC_MOUNT=<pvc-name>:<mount-path>, pass the relevant parameters
from mlrun.platforms import auto_mount
trainer.apply(auto_mount())
<mlrun.runtimes.kubejob.KubejobRuntime at 0x7fdf29b1c190>
Option 2: Using AWS S3 for artifacts#
When using AWS, you can use S3. See more details in S3.
Deploy (build) the function container#
The deploy() command builds a custom container image (creates a cluster build job) from the outlined function dependencies.
If a pre-built container image already exists, pass the image name instead. The code and params can be updated per run without building a new image.
The image is stored in a container repository. By default it uses the repository configured on the MLRun API service. You can specify your own docker registry by first creating a secret, and adding that secret name to the build configuration:
kubectl create -n <namespace> secret docker-registry my-docker --docker-server=https://index.docker.io/v1/ --docker-username=<your-user> --docker-password=<your-password> --docker-email=<your-email>
And then run this:
trainer.build_config(image='target/image:tag', secret='my_docker')
trainer.deploy(with_mlrun=False)
> 2021-01-24 00:05:18,384 [info] starting remote build, image: .mlrun/func-jobs-demo-my-trainer-latest
INFO[0020] Retrieving image manifest mlrun/mlrun:unstable
INFO[0020] Retrieving image manifest mlrun/mlrun:unstable
INFO[0021] Built cross stage deps: map[]
INFO[0021] Retrieving image manifest mlrun/mlrun:unstable
INFO[0021] Retrieving image manifest mlrun/mlrun:unstable
INFO[0021] Executing 0 build triggers
INFO[0021] Unpacking rootfs as cmd RUN pip install pandas requires it.
INFO[0037] RUN pip install pandas
INFO[0037] Taking snapshot of full filesystem...
INFO[0050] cmd: /bin/sh
INFO[0050] args: [-c pip install pandas]
INFO[0050] Running: [/bin/sh -c pip install pandas]
Requirement already satisfied: pandas in /usr/local/lib/python3.7/site-packages (1.2.0)
Requirement already satisfied: pytz>=2017.3 in /usr/local/lib/python3.7/site-packages (from pandas) (2020.5)
Requirement already satisfied: python-dateutil>=2.7.3 in /usr/local/lib/python3.7/site-packages (from pandas) (2.8.1)
Requirement already satisfied: numpy>=1.16.5 in /usr/local/lib/python3.7/site-packages (from pandas) (1.19.5)
Requirement already satisfied: six>=1.5 in /usr/local/lib/python3.7/site-packages (from python-dateutil>=2.7.3->pandas) (1.15.0)
WARNING: You are using pip version 20.2.4; however, version 21.0 is available.
You should consider upgrading via the '/usr/local/bin/python -m pip install --upgrade pip' command.
INFO[0051] Taking snapshot of full filesystem...
True
Run the function on the cluster#
Use with_code to inject the latest code into the function (without requiring a new build).
trainer.with_code()
<mlrun.runtimes.kubejob.KubejobRuntime at 0x7fdf29b1c190>
# run our training task with params
train_run = trainer.run(name='my-training', handler='training', params={'p1': 9})
> 2021-01-24 00:09:14,760 [info] starting run my-training uid=30b8131285a74f87b16d957fabc5fac3 DB=http://mlrun-api:8080
> 2021-01-24 00:09:14,928 [info] Job is running in the background, pod: my-training-lhtxt
> 2021-01-24 00:09:18,972 [warning] Unable to parse server or client version. Assuming compatible: {'server_version': 'unstable', 'client_version': 'unstable'}
Run: my-training (uid=30b8131285a74f87b16d957fabc5fac3)
Params: p1=9, p2=2
> 2021-01-24 00:09:19,050 [info] started training
> 2021-01-24 00:09:19,299 [info] run executed, status=completed
final state: completed
| project | uid | iter | start | state | name | labels | inputs | parameters | results | artifacts |
|---|---|---|---|---|---|---|---|---|---|---|
| jobs-demo | 0 | Jan 24 00:09:19 | completed | my-training | v3io_user=admin kind=job owner=admin host=my-training-lhtxt category=tests |
p1=9 |
accuracy=18 loss=27 |
somefile mydf mymodel |
to track results use .show() or .logs() or in CLI:
!mlrun get run 30b8131285a74f87b16d957fabc5fac3 --project jobs-demo , !mlrun logs 30b8131285a74f87b16d957fabc5fac3 --project jobs-demo
> 2021-01-24 00:09:21,253 [info] run executed, status=completed
# running validation, use the model result from the previous step
model = train_run.outputs['mymodel']
validation_run = trainer.run(name='validation', handler='validation', inputs={'model': model}, watch=True)
> 2021-01-24 00:09:21,259 [info] starting run validation uid=c757ffcdc36d4412b4bcba1df75f079d DB=http://mlrun-api:8080
> 2021-01-24 00:09:21,536 [info] Job is running in the background, pod: validation-dwd78
> 2021-01-24 00:09:25,570 [warning] Unable to parse server or client version. Assuming compatible: {'server_version': 'unstable', 'client_version': 'unstable'}
Run: validation (uid=c757ffcdc36d4412b4bcba1df75f079d)
> 2021-01-24 00:09:25,719 [info] started validation
path to local copy of model file - /User/data/30b8131285a74f87b16d957fabc5fac3/models/model.txt
parameters: {'xx': 'abc', 'one_more': 5}
metrics: {'accuracy': 0.85}
> 2021-01-24 00:09:25,873 [info] run executed, status=completed
final state: completed
| project | uid | iter | start | state | name | labels | inputs | parameters | results | artifacts |
|---|---|---|---|---|---|---|---|---|---|---|
| jobs-demo | 0 | Jan 24 00:09:25 | completed | validation | v3io_user=admin kind=job owner=admin host=validation-dwd78 |
model |
validation |
to track results use .show() or .logs() or in CLI:
!mlrun get run c757ffcdc36d4412b4bcba1df75f079d --project jobs-demo , !mlrun logs c757ffcdc36d4412b4bcba1df75f079d --project jobs-demo
> 2021-01-24 00:09:27,647 [info] run executed, status=completed
Create and run a Kubeflow pipeline#
Kubeflow pipelines are used for workflow automation, creating a graph of functions and their specified parameters, inputs, and outputs.
You can chain the outputs and inputs of the pipeline steps, as illustrated below.
import kfp
from kfp import dsl
from mlrun import run_pipeline
from mlrun import run_function, deploy_function
@dsl.pipeline(
    name = 'job test',
    description = 'demonstrating mlrun usage'
)
def job_pipeline(
   p1: int = 9
) -> None:
    """Define our pipeline.

    :param p1: A model parameter.
    """

    train = run_function('my-trainer',
                            handler='training',
                            params={'p1': p1},
                            outputs=['mymodel'])

    validate = run_function('my-trainer',
                               handler='validation',
                               inputs={'model': train.outputs['mymodel']},
                               outputs=['validation'])
Running the pipeline#
Pipeline results are stored at the artifact_path location. The artifact path for workflows can be one of:
The project’s
artifact_path(set byproject.spec.artifact_path = '<some path>'). MLRun adds/{{workflow.uid}}to the path if it does not already include it.MLRun’s default
artifact-path, if set. MLRun adds/{{workflow.uid}}’ to the path if it does not already include it.The
artifact_pathas passed to the specific call forrun(), as shown below. In this case, MLRun does not modify the user-provided path.
If you want to customize the path, per workflow, use:
artifact_path = 'v3io:///users/admin/kfp/{{workflow.uid}}/'
arguments = {'p1': 8}
run_id = run_pipeline(job_pipeline, arguments, experiment='my-job', artifact_path=artifact_path)
from mlrun import wait_for_pipeline_completion, get_run_db
wait_for_pipeline_completion(run_id)
db = get_run_db().list_runs(project=project_name, labels=f'workflow={run_id}').show()
| project | uid | iter | start | state | name | labels | inputs | parameters | results | artifacts |
|---|---|---|---|---|---|---|---|---|---|---|
| jobs-demo | 0 | Jan 24 00:10:05 | completed | my-trainer-validation | v3io_user=admin owner=admin workflow=26ac4209-8505-47a3-b807-e9c51061bf0d kind=job host=my-trainer-validation-gkvjw |
model |
validation |
|||
| jobs-demo | 0 | Jan 24 00:09:53 | completed | my-trainer-training | v3io_user=admin owner=admin workflow=26ac4209-8505-47a3-b807-e9c51061bf0d kind=job host=my-trainer-training-jb6rz category=tests |
p1=8 |
accuracy=16 loss=24 |
somefile mydf mymodel |
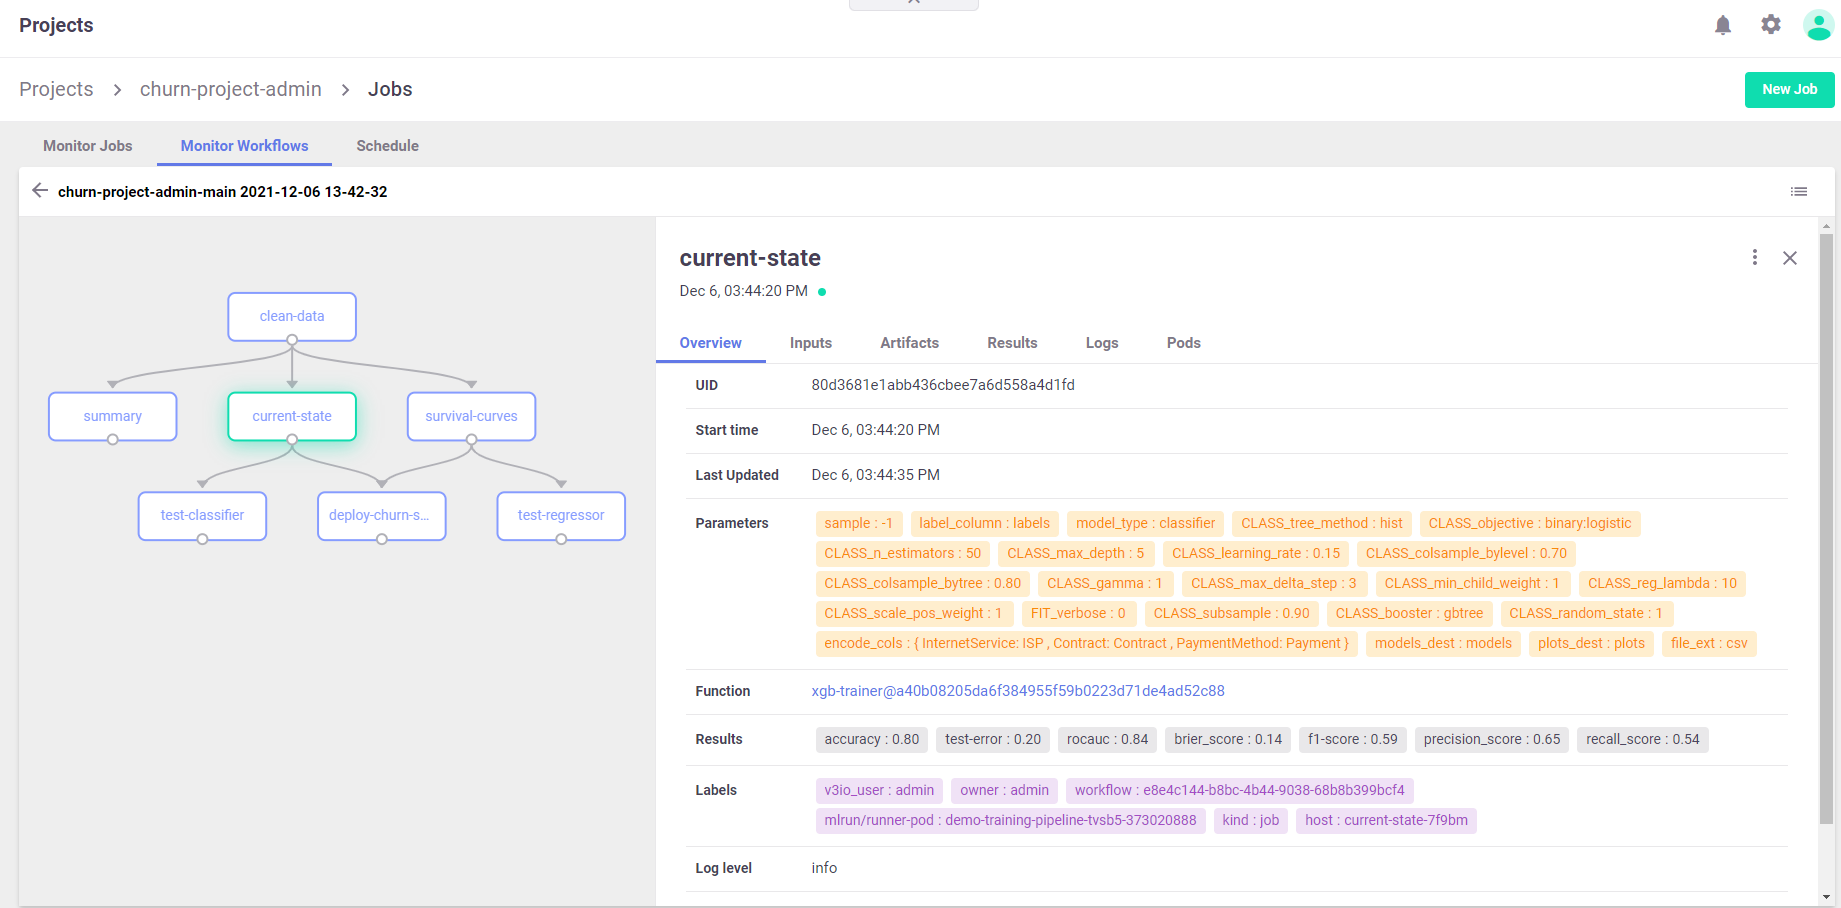
Viewing the pipeline on the dashboard (UI)#
In the Projects > Jobs and Workflows > Monitor Workflows tab, press the workflow name to view a graph of the workflow. Press any step to open a pane with full details of the step: either the job’s overview, inputs, artifacts, etc.; or the deploy / build function’s overview, code, and log. The color of the step, after pressing, indicates the status. See the status description in the Log tab. The graph is refreshed while the pipeline is running.