Create and use functions
Contents
Create and use functions#
Functions are the basic building blocks of MLRun. They are essentially Python objects that know how to run locally or on a Kubernetes cluster. This section covers how to create and customize an MLRun function, as well as common parameters across all functions.
In this section:
Functions overview#
MLRun functions are used to run jobs, deploy models, create pipelines, and more. There are various kinds of MLRun functions with different capabilities, however, there are commonalities across all functions. In general, an MLRun function looks like the following:
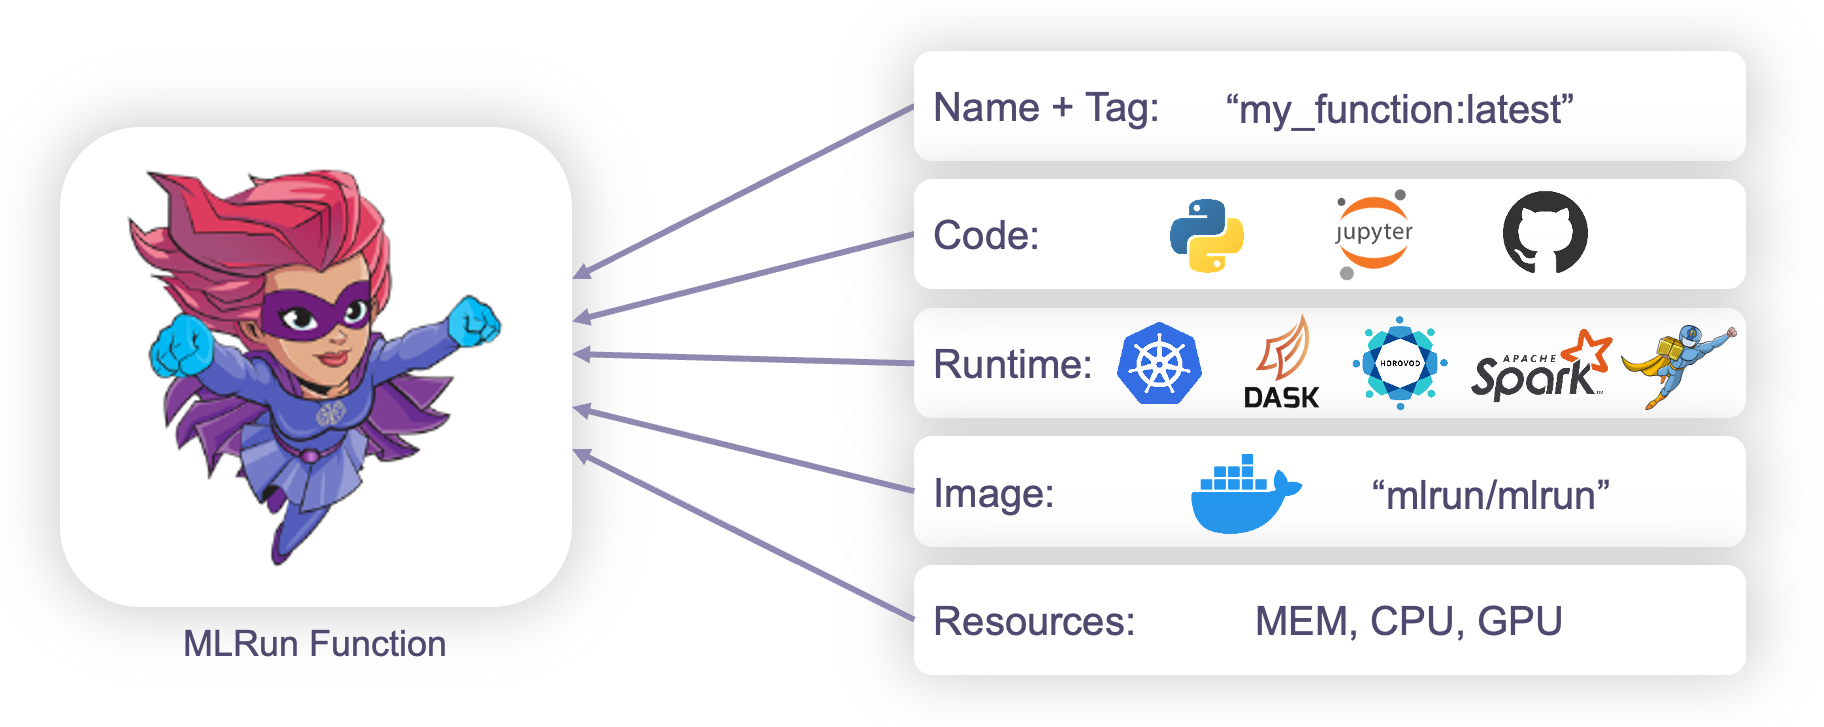
You can read more about MLRun Functions here. Each parameter and capability is explained in more detail in the following sections Creating functions and Customizing functions.
Functions and projects#
Function are members of an MLRun project. Once you register a function within a project, you can execute it in your local environment or at scale on a Kubernetes cluster.
The relationship between functions, workflows, and projects is as follows:
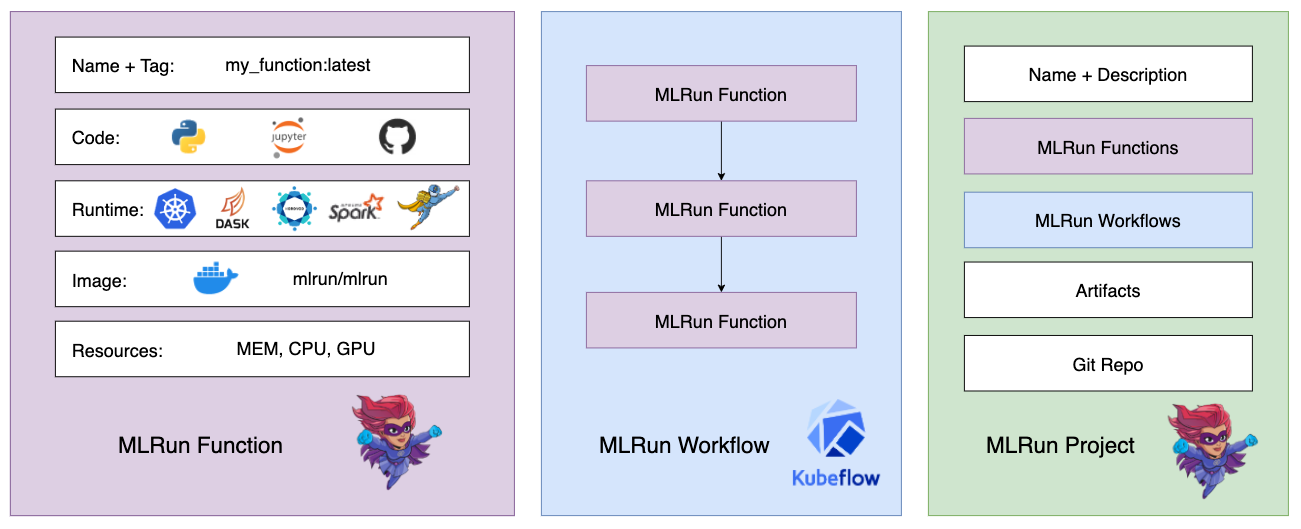
After the MLRun functions and workflows are created and registered into the project, they are invoked using the project object. This workflow pairs especially well with Git and CI/CD integration.
Creating functions#
The recommended way to create an MLRun function is by using an MLRun project (see create and use projects). The general flow looks like the following:
project = mlrun.get_or_create_project(...)

fn = project.set_function(...)
When creating a function, there are 3 main scenarios:
Single source file — when your code can be contained in a single file
Multiple source files — when your code requires additional files or dependencies
Import existing function — when your function already exists elsewhere and you just want to import it
Note
Using the set_function method of an MLRun project allows for each of these scenarios in a transparent way. Depending on the source passed in, the project registers the function using some lower level functions. For specific use cases, you also have access to the lower level functions new_function(), code_to_function(), and import_function().
Using set_function#
The MLRun project object has a method called set_function(), which is a one-size-fits-all way of creating an MLRun function. This method accepts a variety of sources including Python files, Jupyter Notebooks, Git repos, and more.
Note
The return value of set_function is your MLRun function. You can immediately run it or apply additional configurations like resources, scaling, etc. See Customizing functions for more details.
When using set_function there are a number of common parameters across all function types and creation scenarios. Consider the following example:
fn = project.set_function(
    name="my-function", tag="latest", func="my_function.py",
    image="mlrun/mlrun", kind="job", handler="train_model",
    requirements=["pandas==1.3.5"], with_repo=True
)
name: Name of your MLRun function within the given project. This is displayed in the MLRun UI, as well as the Kubernetes pod.
tag: Tag for your function (much like a Docker image). Omitting this parameter defaults to
latest.func: What to run with the MLRun function. This can be a number of things including files (
.py,.ipynb,.yaml, etc.), URIs (hub://prefixed Function Hub URI,db://prefixed MLRun DB URI), existing MLRun function objects, orNone(for current.ipynbfile).image: Docker image to use when containerizing the piece of code. If you also specify the
requirementsparameter to build a new Docker image, theimageparameter is used as the base image.kind: Runtime the MLRun function uses. See Kinds of functions (runtimes) forthe list of supported batch and real-time runtimes.
handler: Default function handler to invoke (e.g. a Python function within your script). This handler can also be overriden when executing the function.
requirements: Additional Python dependencies needed for the function to run. Using this parameter results in a new Docker image (using the
imageparameter as a base image). This can be a list of Python dependencies or a path to arequirements.txtfile.with_repo: Whether a function requires additional files or dependencies within a Git repo or archive file. This Git repo or archive file is specified on a project level via
project.set_source(...), which the function consumes. If this parameter is omitted, the default isFalse.
Building images#
If your MLRun function requires additional libraries or files, you might need to build a new Docker image. You can do this by specifying a base image to use as the image, your requirements via requirements, and (optionally) your source code via with_repo=True (where the source is specified by project.set_source(...)). See Build function image for more information on when a build is required.
Note
When using with_repo, the contents of the Git repo or archive are available in the current working directory of your MLRun function during runtime.
A good place to start is one of the default MLRun images:
mlrun/mlrun: Suits most lightweight components (includessklearn,pandas,numpyand more)mlrun/ml-models: Suits most CPU ML/DL workloads (includesTensorflow,Keras,PyTorchand more)mlrun/ml-models-gpu: Suits most GPU ML/DL workloads (includes GPUTensorflow,Keras,PyTorchand more )
Dockerfiles for the MLRun images can be found here.
Single source file#
The simplest way to create a function is to use a single file as the source. The code itself is embedded into the MLRun function object. This makes the function quite portable since it does not depend on any external files. You can use any source file supported by MLRun such as Python or Jupyter notebook.
Note
MLRun is not limited to Python. Files of type Bash, Go, etc. are also supported.
Python#
This is the simplest way to create a function out of a given piece of code. Simply pass in the path to the Python file relative to your project context directory.
fn = project.set_function(
    name="python", func="job.py",  kind="job",
    image="mlrun/mlrun", handler="handler"
)
Jupyter Notebook#
This is a great way to create a function out of a Jupyter Notebook. Just pass in the path to the Jupyter Notebook relative to your project context directory. You can use MLRun cell tags to specify which parts of the notebook should be included in the function.
Note
To ensure that the latest changes are included, make sure you save your notebook before creating/updating the function.
fn = project.set_function(
    name="notebook", func="nb.ipynb", kind="serving",
    image="mlrun/ml-models", requirements=["pandas==1.3.5"]
)
You can also create an MLRun function out of the current Jupyter Notebook you are running in. To do this, simply ommit the func parameter in set_function.
Multiple source files#
If your code requires additional files or external libraries, you need to use a source that supports multiple files such as Git, an archive (zip/tar/etc.), or V3IO file share. This approach (especially using a Git repo) pairs well with MLRun projects.
To do this, you must:
Provide
with_repo=Truewhen creating your function viaproject.set_function(...)Set project source via
project.set_source(source=...)
This instructs MLRun to load source code from the git repo/archive/file share associated with the project. There are two ways to load these additional files:
Load code from container#
The function is built once. This is the preferred approach for production workloads. For example:
project.set_source(source="git://github.com/mlrun/project-archive.git")

fn = project.set_function(
    name="myjob", handler="job_func.job_handler",
    image="mlrun/mlrun", kind="job", with_repo=True,
)

project.build_function(fn)
Load code at runtime#
The function pulls the source code at runtime. This is a simpler approach during development that allows for making code changes without re-building the image each time. For example:
archive_url = "https://s3.us-east-1.wasabisys.com/iguazio/project-archive/project-archive.zip"
project.set_source(source=archive_url, pull_at_runtime=True)

fn = project.set_function(
    name="nuclio", handler="nuclio_func:nuclio_handler",
    image="mlrun/mlrun", kind="nuclio", with_repo=True,
)
Import or use an existing function#
If you already have an MLRun function that you want to import, you can do so from multiple locations such as YAML, Function Hub, and MLRun DB.
YAML#
MLRun functions can be exported to YAML files via fn.export(). These YAML files can then be imported via the following:
fn = project.set_function(name="import", func="function.yaml")
Function Hub#
Functions can also be imported from the MLRun Function Hub: simply import using the name of the function and the hub:// prefix:
Note
By default, the hub:// prefix points to the official Function Hub. You can, however, also substitute your own repo to create your own hub.
fn = project.set_function(name="describe", func="hub://describe")
MLRun DB#
You can also import functions directly from the MLRun DB. These could be functions that have not been pushed to a git repo, archive, or Function Hub. Import via the name of the function and the db:// prefix:
fn = project.set_function(name="db", func="db://import")
MLRun function#
You can also directly use an existing MLRun function object. This is usually used when more granular control over function parameters is required (e.g. advanced parameters that are not supported by set_function()).
This example uses a real-time serving pipeline (graph).
fn = mlrun.new_function("serving", kind="serving", image="mlrun/mlrun")
graph = serving.set_topology("flow")
graph.to(name="double", handler="mylib.double") \
     .to(name="add3", handler="mylib.add3") \
     .to(name="echo", handler="mylib.echo").respond()

project.set_function(name="serving", func=fn, with_repo=True)
Customizing functions#
Once you have created your MLRun function, there are many customizations you can add. Some potential customizations include:
Environment variables#
Environment variables can be added individually, from a Python dictionary, or a file:
# Single variable
fn.set_env(name="MY_ENV", value="MY_VAL")

# Multiple variables
fn.set_envs(env_vars={"MY_ENV" : "MY_VAL", "SECOND_ENV" : "SECOND_VAL"})

# Multiple variables from file
fn.set_envs(file_path="env.txt")
Memory, CPU, GPU resources#
Adding requests and limits to your function specify what compute resources are required. It is best practice to define this for each MLRun function. See CPU, GPU, and memory limits for user jobs for more information on configuring resources.
# Requests - lower bound
fn.with_requests(mem="1G", cpu=1)

# Limits - upper bound
fn.with_limits(mem="2G", cpu=2, gpus=1)
Scaling and auto-scaling#
Scaling behavior can be added to real-time and distributed runtimes including nuclio, serving, spark, dask, and mpijob. See Replicas to see how to configure scaling behavior per runtime. This example demonstrates setting replicas for nuclio/serving runtimes:
# Nuclio/serving scaling
fn.spec.replicas = 2
fn.spec.min_replicas = 1
fn.spec.min_replicas = 4
Mount persistent storage#
In some instances, you might need to mount a file-system to your container to persist data. This can be done with native K8s PVC’s or the V3IO data layer for Iguazio clusters. See Attach storage to functions for more information on the storage options.
# Mount persistent storage - V3IO
fn.apply(mlrun.mount_v3io())

# Mount persistent storage - PVC
fn.apply(mlrun.platforms.mount_pvc(pvc_name="data-claim", volume_name="data", volume_mount_path="/data"))
Node selection#
Node selection can be used to specify where to run workloads (e.g. specific node groups, instance types, etc.). This is a more advanced parameter mainly used in production deployments to isolate platform services from workloads. See Node affinity for more information on how to configure node selection.
# Only run on non-spot instances
fn.with_node_selection(node_selector={"app.iguazio.com/lifecycle" : "non-preemptible"})