
Quick Start Tutorial
Contents
Quick Start Tutorial#
How to easily Train and Deploy Models to Production with MLRun
This notebook provides a quick overview of developing and deploying machine learning applications to production using MLRun MLOps orchestration framework. Watch the video for this tutorial.
Tutorial steps:
Install MLRun package and dependencies:
Before you start, make sure MLRun client package is installed (pip install mlrun) and the environment is set (pointing to a local or Kubernetes based MLRun service).
# verify the sklearn version (restart the notebook after the install), run only once
!pip install scikit-learn~=1.0.0
import mlrun
# check if we are attached to k8s for running remote (container) jobs
no_k8s = False if mlrun.mlconf.namespace else True
Define MLRun project and ML functions#
MLRun Project is a container for all your work on a particular activity or application. Projects host functions, workflow,
artifacts, secrets, and more. Projects have access control and can be accessed by one or more users; they are usually associated with a GIT and interact with CI/CD frameworks for automation.
See the MLRun Projects documentation.
MLRun Serverless Function specify the source code, base image, extra package requirements, runtime engine kind, and desired resources (cpu, gpu, mem, storage, …). The runtime engines (local, job, Nuclio, Spark, etc.) automatically transform the function code and spec into fully managed and elastic services that run over Kubernetes.
Function source code can come from a single file (.py, .ipynb, etc.) or a full archive (git, zip, tar). MLRun can execute an entire file/notebook or specific function classes/handlers.
Functions in this project:
gen_breast_cancer.py (view)
(download)- Breast Cancer data generatortrainer.py (view)
(download)- Model Training functionserving.py (view)
(download)- Model serving function
Registering the function code and basic info in the project:
project = mlrun.new_project("breast-cancer", "./", user_project=True, init_git=True)
project.set_function("gen_breast_cancer.py", "gen-breast-cancer", image="mlrun/mlrun")
project.set_function("trainer.py", "trainer",
handler="train", image="mlrun/mlrun")
project.set_function("serving.py", "serving", image="mlrun/mlrun", kind="serving")
project.save()
The project spec (project.yaml) is saved to the project root dir for use by CI/CD and automation frameworks.
Run data processing function and log artifacts#
Functions are executed (using the CLI or SDK run command) with an optional handler, various params, inputs and resource requirements. This generates a run object that can be tracked through the CLI, UI, and SDK. Multiple functions can be executed and tracked as part of a multi-stage pipeline (workflow).
When a function has additional package
requirementsor need to include the content of asourcearchive, you must first build the function using theproject.build_function()method.
The local flag indicates if the function is executed locally or “teleported” and executed in the Kubernetes cluster. The execution progress and results can be viewed in the UI (see hyperlinks below).
Run using the SDK:
gen_data_run = project.run_function("gen-breast-cancer", params={"format": "csv"}, local=True)
> 2022-05-08 11:11:14,002 [info] starting run gen-breast-cancer uid=9609cb9609734b308c94cd0faf8c915a DB=http://mlrun-api:8080
> 2022-05-08 11:11:15,540 [info] handler was not provided running main (./gen_breast_cancer.py)
> 2022-05-08 11:11:31,359 [info] logging run results to: http://mlrun-api:8080
> 2022-05-08 11:11:31,460 [info] saving breast cancer dataframe
| project | uid | iter | start | state | name | labels | inputs | parameters | results | artifacts |
|---|---|---|---|---|---|---|---|---|---|---|
| breast-cancer-admin | 0 | May 08 11:11:31 | completed | gen-breast-cancer | v3io_user=admin kind= owner=admin host=jupyter-b7945bb6c-4hvj4 |
format=csv |
label_column=label |
dataset |
> 2022-05-08 11:11:32,511 [info] run executed, status=completed
Run using the CLI (command line):
The functions can also be invoked using the following CLI command (see help with: mlrun run --help):
mlrun run -f gen-breast-cancer --local
Print the run state and outputs:
gen_data_run.state()
'completed'
gen_data_run.outputs
{'label_column': 'label',
'dataset': 'store://artifacts/breast-cancer-admin/gen-breast-cancer_dataset:d58cbce3b81c4b7c9d557a6f2bc858c8'}
Print the output dataset artifact (DataItem object) as dataframe
gen_data_run.artifact("dataset").as_df().head()
| mean radius | mean texture | mean perimeter | mean area | mean smoothness | mean compactness | mean concavity | mean concave points | mean symmetry | mean fractal dimension | ... | worst texture | worst perimeter | worst area | worst smoothness | worst compactness | worst concavity | worst concave points | worst symmetry | worst fractal dimension | label | |
|---|---|---|---|---|---|---|---|---|---|---|---|---|---|---|---|---|---|---|---|---|---|
| 0 | 17.99 | 10.38 | 122.80 | 1001.0 | 0.11840 | 0.27760 | 0.3001 | 0.14710 | 0.2419 | 0.07871 | ... | 17.33 | 184.60 | 2019.0 | 0.1622 | 0.6656 | 0.7119 | 0.2654 | 0.4601 | 0.11890 | 0 |
| 1 | 20.57 | 17.77 | 132.90 | 1326.0 | 0.08474 | 0.07864 | 0.0869 | 0.07017 | 0.1812 | 0.05667 | ... | 23.41 | 158.80 | 1956.0 | 0.1238 | 0.1866 | 0.2416 | 0.1860 | 0.2750 | 0.08902 | 0 |
| 2 | 19.69 | 21.25 | 130.00 | 1203.0 | 0.10960 | 0.15990 | 0.1974 | 0.12790 | 0.2069 | 0.05999 | ... | 25.53 | 152.50 | 1709.0 | 0.1444 | 0.4245 | 0.4504 | 0.2430 | 0.3613 | 0.08758 | 0 |
| 3 | 11.42 | 20.38 | 77.58 | 386.1 | 0.14250 | 0.28390 | 0.2414 | 0.10520 | 0.2597 | 0.09744 | ... | 26.50 | 98.87 | 567.7 | 0.2098 | 0.8663 | 0.6869 | 0.2575 | 0.6638 | 0.17300 | 0 |
| 4 | 20.29 | 14.34 | 135.10 | 1297.0 | 0.10030 | 0.13280 | 0.1980 | 0.10430 | 0.1809 | 0.05883 | ... | 16.67 | 152.20 | 1575.0 | 0.1374 | 0.2050 | 0.4000 | 0.1625 | 0.2364 | 0.07678 | 0 |
5 rows × 31 columns
Use MLRun built-in marketplace functions (data analysis)#
You can import an ML function from the mlrun public marketplace or private repositories and use them in your project. Let’s import and use a data analysis function:
# import the function
describe = mlrun.import_function('hub://describe')
See the
describefunction usage instructions in the marketplace or by typingdescribe.doc()
Analyze the dataset using the describe function (run on the Kubernetes cluster):
describe_run = describe.run(params={'label_column': 'label'},
inputs={"table": gen_data_run.outputs['dataset']}, local=no_k8s)
> 2022-05-08 10:34:00,643 [info] starting run describe-analyze uid=0bd1b5e6151a49dbbeec91993b725a2c DB=http://mlrun-api:8080
> 2022-05-08 10:34:00,910 [info] Job is running in the background, pod: describe-analyze-qzqpx
> 2022-05-08 10:36:41,374 [info] The data set named dataset is updated
> 2022-05-08 10:36:41,466 [info] run executed, status=completed
final state: completed
| project | uid | iter | start | state | name | labels | inputs | parameters | results | artifacts |
|---|---|---|---|---|---|---|---|---|---|---|
| breast-cancer-admin | 0 | May 08 10:34:05 | completed | describe-analyze | v3io_user=admin kind=job owner=admin mlrun/client_version=1.0.0 host=describe-analyze-qzqpx |
table |
label_column=label |
describe-csv histograms-matrix histograms violin imbalance imbalance-weights-vec correlation-matrix-csv correlation |
> 2022-05-08 10:36:44,391 [info] run executed, status=completed
View the results in MLRun UI:
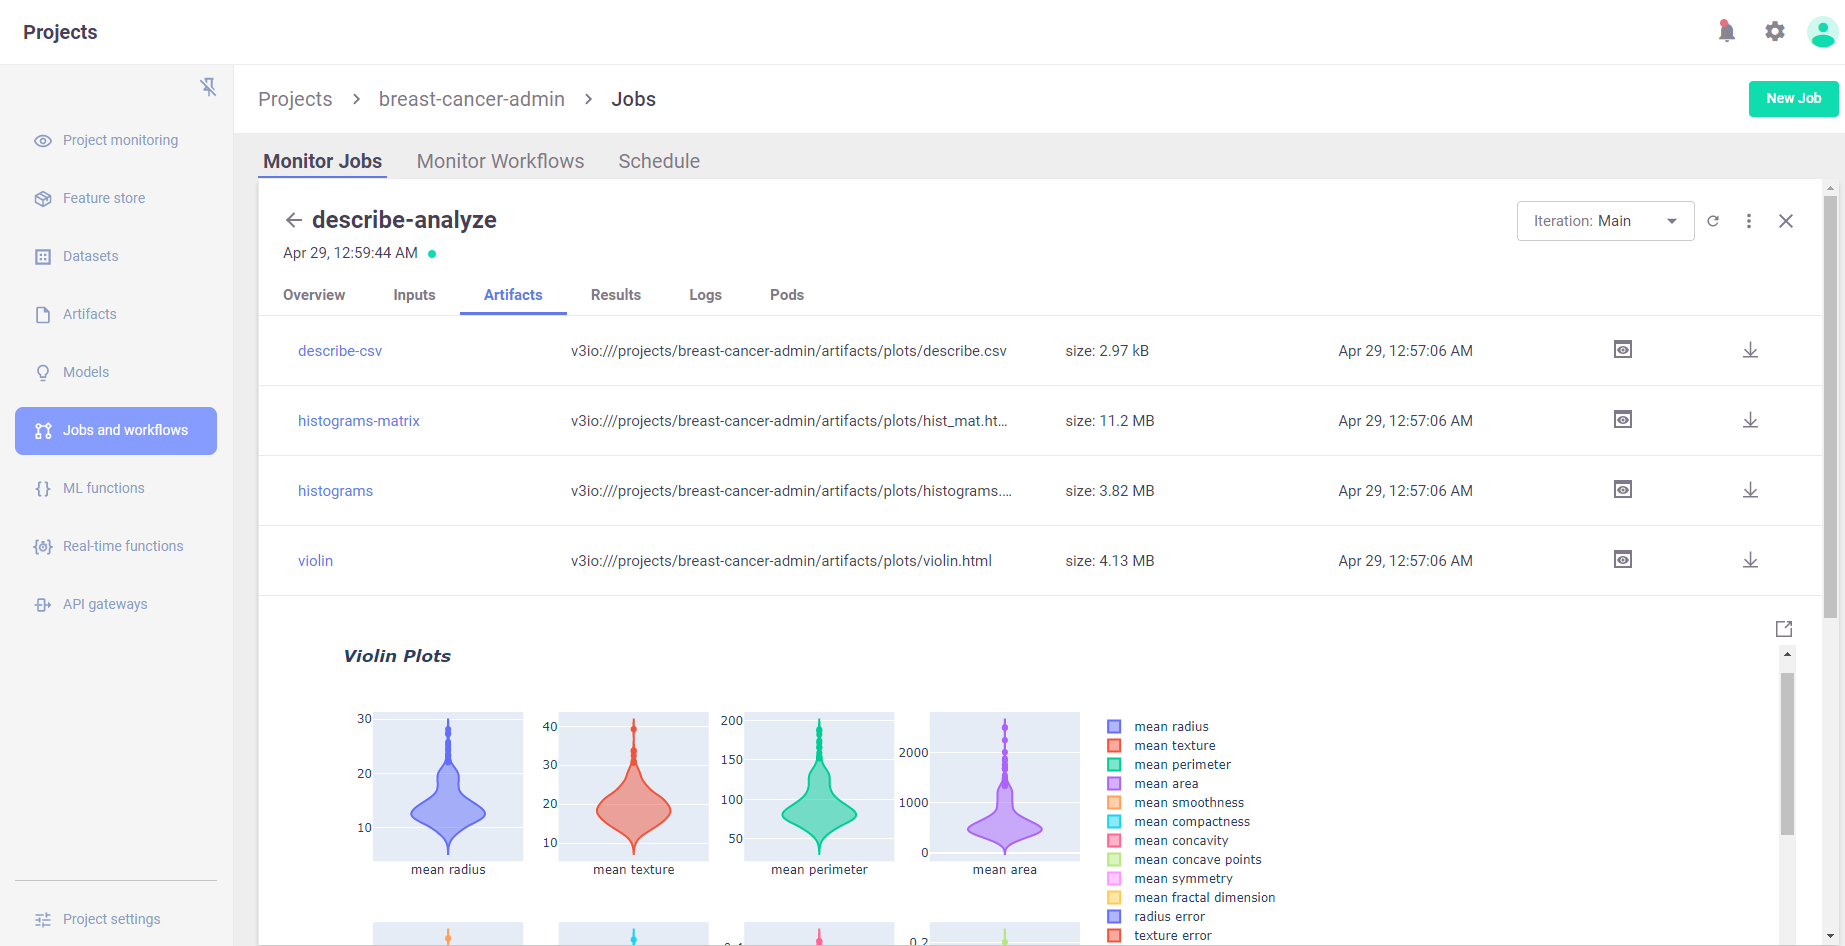
# view generated artifacts (charts)
describe_run.outputs
{'describe-csv': 'v3io:///projects/breast-cancer-admin/artifacts/plots/describe.csv',
'histograms-matrix': 'v3io:///projects/breast-cancer-admin/artifacts/plots/hist_mat.html',
'histograms': 'v3io:///projects/breast-cancer-admin/artifacts/plots/histograms.html',
'violin': 'v3io:///projects/breast-cancer-admin/artifacts/plots/violin.html',
'imbalance': 'v3io:///projects/breast-cancer-admin/artifacts/plots/imbalance.html',
'imbalance-weights-vec': 'v3io:///projects/breast-cancer-admin/artifacts/plots/imbalance-weights-vec.csv',
'correlation-matrix-csv': 'v3io:///projects/breast-cancer-admin/artifacts/plots/correlation-matrix.csv',
'correlation': 'v3io:///projects/breast-cancer-admin/artifacts/plots/correlation.html'}
# view an artifact in Jupyter
describe_run.artifact("histograms").show()
Train, track, and register models#
in the trainer.py (view) code file, notice the line:
apply_mlrun(model=model, model_name="my_model", x_test=x_test, y_test=y_test)
apply_mlrun() accepts the model object and various optional parameters and automatically logs/registers the model
along with its metrics and various charts.
When specifying the x_test and y_test data it generates various plots and calculations to evaluate the model.
Metadata and parameters are automatically recorded (from MLRun context object) and don’t need to be specified.
trainer_run = project.run_function(
"trainer",
inputs={"dataset": gen_data_run.outputs["dataset"]},
params = {"n_estimators": 100, "learning_rate": 1e-1, "max_depth": 3},
local=True
)
> 2022-05-08 10:36:44,505 [info] starting run trainer-train uid=59b5f17891894669943783e4ff341060 DB=http://mlrun-api:8080
| project | uid | iter | start | state | name | labels | inputs | parameters | results | artifacts |
|---|---|---|---|---|---|---|---|---|---|---|
| breast-cancer-admin | 0 | May 08 10:36:44 | completed | trainer-train | v3io_user=admin kind= owner=admin host=jupyter-b7945bb6c-4hvj4 |
dataset |
n_estimators=100 learning_rate=0.1 max_depth=3 |
accuracy=0.956140350877193 f1_score=0.965034965034965 precision_score=0.9583333333333334 recall_score=0.971830985915493 |
feature-importance test_set confusion-matrix roc-curves calibration-curve model |
> 2022-05-08 10:36:50,047 [info] run executed, status=completed
Results and artifacts are generated and tracked automatically by MLRun:
trainer_run.outputs
{'accuracy': 0.956140350877193,
'f1_score': 0.965034965034965,
'precision_score': 0.9583333333333334,
'recall_score': 0.971830985915493,
'feature-importance': 'v3io:///projects/breast-cancer-admin/artifacts/feature-importance.html',
'test_set': 'store://artifacts/breast-cancer-admin/trainer-train_test_set:59b5f17891894669943783e4ff341060',
'confusion-matrix': 'v3io:///projects/breast-cancer-admin/artifacts/confusion-matrix.html',
'roc-curves': 'v3io:///projects/breast-cancer-admin/artifacts/roc-curves.html',
'calibration-curve': 'v3io:///projects/breast-cancer-admin/artifacts/calibration-curve.html',
'model': 'store://artifacts/breast-cancer-admin/cancer_classifier:59b5f17891894669943783e4ff341060'}
trainer_run.artifact('feature-importance').show()
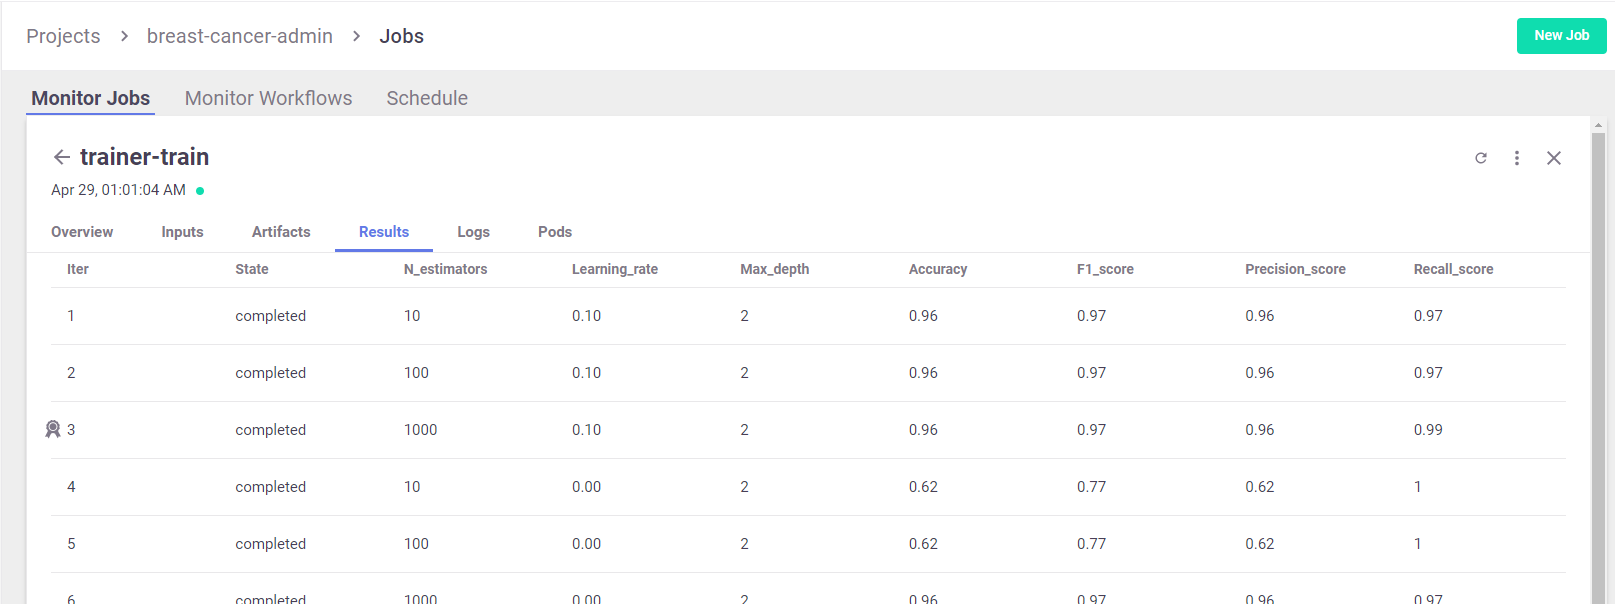
Hyper-parameter tuning and model/experiment comparison#
Run a GridSearch with a couple of parameters, and select the best run with respect to the max accuracy.
(read more about MLRun Hyper-Param and Iterative jobs).
For basic usage you can run the hyperparameters tuning job by using the arguments:
hyperparamsfor the hyperparameters options and values of choice.selectorfor specifying how to select the best model.
hp_tuning_run = project.run_function(
"trainer",
inputs={"dataset": gen_data_run.outputs["dataset"]},
hyperparams={
"n_estimators": [10, 100, 1000],
"learning_rate": [1e-1, 1e-3],
"max_depth": [2, 8]
},
selector="max.accuracy",
local=no_k8s
)
> 2022-05-08 10:36:50,142 [info] starting run trainer-train uid=d31605613a794006bba54cfd7262c036 DB=http://mlrun-api:8080
> 2022-05-08 10:36:50,410 [info] Job is running in the background, pod: trainer-train-glqkw
> 2022-05-08 10:37:39,521 [info] best iteration=3, used criteria max.accuracy
> 2022-05-08 10:37:40,368 [info] run executed, status=completed
final state: completed
| project | uid | iter | start | state | name | labels | inputs | parameters | results | artifacts |
|---|---|---|---|---|---|---|---|---|---|---|
| breast-cancer-admin | 0 | May 08 10:36:53 | completed | trainer-train | v3io_user=admin kind=job owner=admin mlrun/client_version=1.0.0 |
dataset |
best_iteration=3 accuracy=0.9649122807017544 f1_score=0.9722222222222222 precision_score=0.958904109589041 recall_score=0.9859154929577465 |
feature-importance test_set confusion-matrix roc-curves calibration-curve model iteration_results parallel_coordinates |
> 2022-05-08 10:37:40,547 [info] run executed, status=completed
View Hyper-param results and the selected run in the MLRun UI:
Interactive Parallel Coordinates Plot:
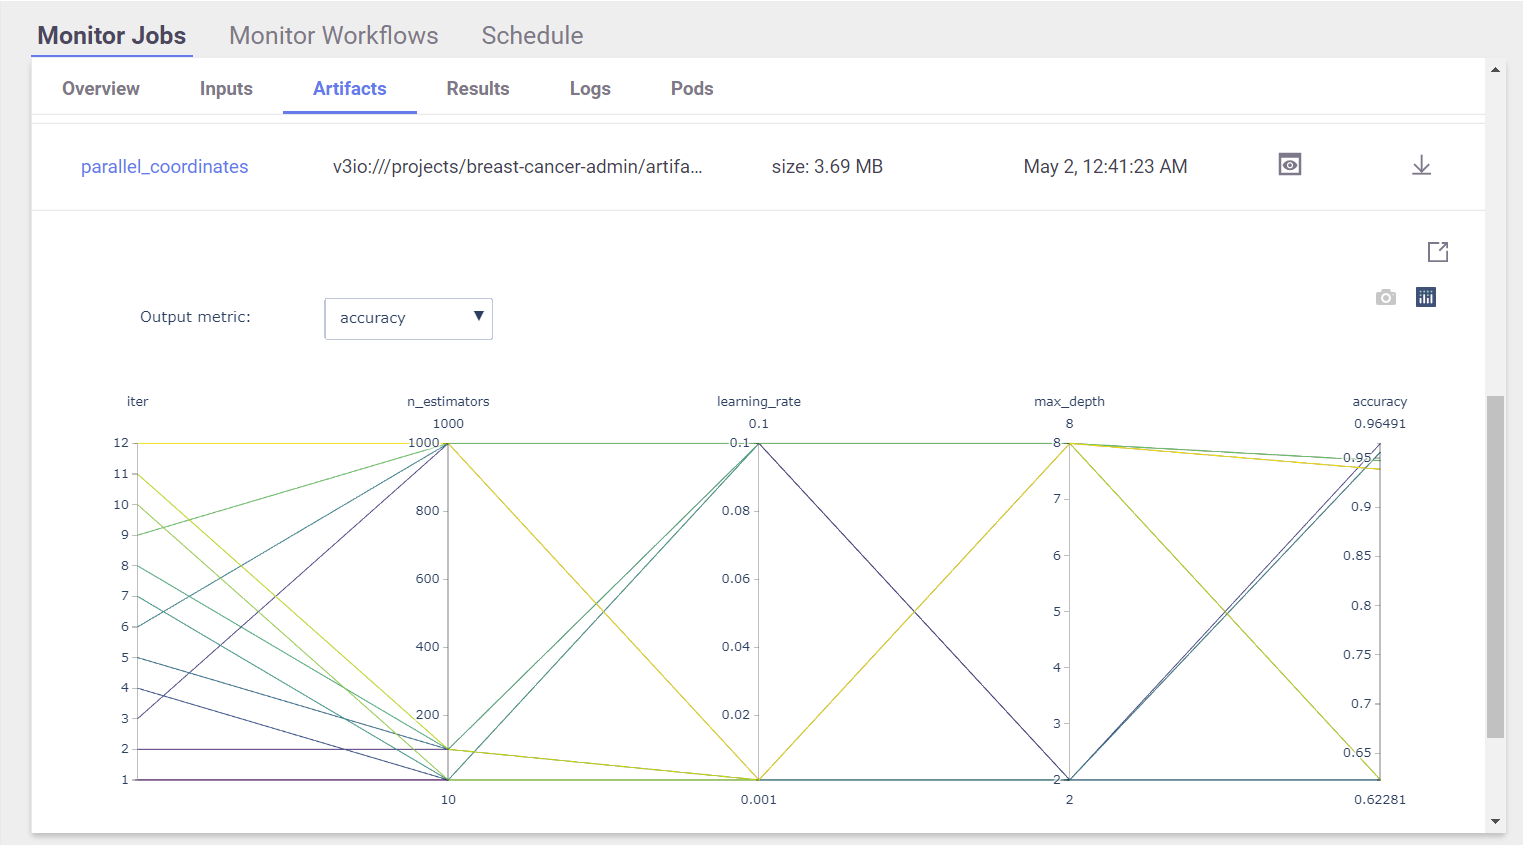
List the generated models and compare the different runs:
hp_tuning_run.outputs
{'best_iteration': 3,
'accuracy': 0.9649122807017544,
'f1_score': 0.9722222222222222,
'precision_score': 0.958904109589041,
'recall_score': 0.9859154929577465,
'feature-importance': 'v3io:///projects/breast-cancer-admin/artifacts/3/feature-importance.html',
'test_set': 'store://artifacts/breast-cancer-admin/trainer-train_test_set:d31605613a794006bba54cfd7262c036',
'confusion-matrix': 'v3io:///projects/breast-cancer-admin/artifacts/3/confusion-matrix.html',
'roc-curves': 'v3io:///projects/breast-cancer-admin/artifacts/3/roc-curves.html',
'calibration-curve': 'v3io:///projects/breast-cancer-admin/artifacts/3/calibration-curve.html',
'model': 'store://artifacts/breast-cancer-admin/cancer_classifier:d31605613a794006bba54cfd7262c036',
'iteration_results': 'v3io:///projects/breast-cancer-admin/artifacts/iteration_results.csv',
'parallel_coordinates': 'v3io:///projects/breast-cancer-admin/artifacts/parallel_coordinates.html'}
# list the models in the project (can apply filters)
models = project.list_models()
for model in models:
print(f"uri: {model.uri}, metrics: {model.metrics}")
uri: store://models/breast-cancer-admin/cancer_classifier#0:59b5f17891894669943783e4ff341060, metrics: {'accuracy': 0.956140350877193, 'f1_score': 0.965034965034965, 'precision_score': 0.9583333333333334, 'recall_score': 0.971830985915493}
uri: store://models/breast-cancer-admin/cancer_classifier#1:d31605613a794006bba54cfd7262c036, metrics: {'accuracy': 0.956140350877193, 'f1_score': 0.965034965034965, 'precision_score': 0.9583333333333334, 'recall_score': 0.971830985915493}
uri: store://models/breast-cancer-admin/cancer_classifier#2:d31605613a794006bba54cfd7262c036, metrics: {'accuracy': 0.956140350877193, 'f1_score': 0.965034965034965, 'precision_score': 0.9583333333333334, 'recall_score': 0.971830985915493}
uri: store://models/breast-cancer-admin/cancer_classifier#3:d31605613a794006bba54cfd7262c036, metrics: {'accuracy': 0.9649122807017544, 'f1_score': 0.9722222222222222, 'precision_score': 0.958904109589041, 'recall_score': 0.9859154929577465}
uri: store://models/breast-cancer-admin/cancer_classifier#4:d31605613a794006bba54cfd7262c036, metrics: {'accuracy': 0.6228070175438597, 'f1_score': 0.7675675675675676, 'precision_score': 0.6228070175438597, 'recall_score': 1.0}
uri: store://models/breast-cancer-admin/cancer_classifier#5:d31605613a794006bba54cfd7262c036, metrics: {'accuracy': 0.6228070175438597, 'f1_score': 0.7675675675675676, 'precision_score': 0.6228070175438597, 'recall_score': 1.0}
uri: store://models/breast-cancer-admin/cancer_classifier#6:d31605613a794006bba54cfd7262c036, metrics: {'accuracy': 0.956140350877193, 'f1_score': 0.965034965034965, 'precision_score': 0.9583333333333334, 'recall_score': 0.971830985915493}
uri: store://models/breast-cancer-admin/cancer_classifier#7:d31605613a794006bba54cfd7262c036, metrics: {'accuracy': 0.9385964912280702, 'f1_score': 0.951048951048951, 'precision_score': 0.9444444444444444, 'recall_score': 0.9577464788732394}
uri: store://models/breast-cancer-admin/cancer_classifier#8:d31605613a794006bba54cfd7262c036, metrics: {'accuracy': 0.9473684210526315, 'f1_score': 0.9577464788732394, 'precision_score': 0.9577464788732394, 'recall_score': 0.9577464788732394}
uri: store://models/breast-cancer-admin/cancer_classifier#9:d31605613a794006bba54cfd7262c036, metrics: {'accuracy': 0.9385964912280702, 'f1_score': 0.951048951048951, 'precision_score': 0.9444444444444444, 'recall_score': 0.9577464788732394}
uri: store://models/breast-cancer-admin/cancer_classifier#10:d31605613a794006bba54cfd7262c036, metrics: {'accuracy': 0.6228070175438597, 'f1_score': 0.7675675675675676, 'precision_score': 0.6228070175438597, 'recall_score': 1.0}
uri: store://models/breast-cancer-admin/cancer_classifier#11:d31605613a794006bba54cfd7262c036, metrics: {'accuracy': 0.6228070175438597, 'f1_score': 0.7675675675675676, 'precision_score': 0.6228070175438597, 'recall_score': 1.0}
uri: store://models/breast-cancer-admin/cancer_classifier#12:d31605613a794006bba54cfd7262c036, metrics: {'accuracy': 0.9385964912280702, 'f1_score': 0.951048951048951, 'precision_score': 0.9444444444444444, 'recall_score': 0.9577464788732394}
# to view the full model object use:
# print(models[0].to_yaml())
# compare the runs (generate interactive parallel coordinates plot and a table)
project.list_runs(name="trainer-train", iter=True).compare()
| uid | iter | start | state | name | parameters | results |
|---|---|---|---|---|---|---|
| 12 | May 08 10:37:31 | completed | trainer-train | n_estimators=1000 learning_rate=0.001 max_depth=8 |
accuracy=0.9385964912280702 f1_score=0.951048951048951 precision_score=0.9444444444444444 recall_score=0.9577464788732394 |
|
| 11 | May 08 10:37:28 | completed | trainer-train | n_estimators=100 learning_rate=0.001 max_depth=8 |
accuracy=0.6228070175438597 f1_score=0.7675675675675676 precision_score=0.6228070175438597 recall_score=1.0 |
|
| 10 | May 08 10:37:26 | completed | trainer-train | n_estimators=10 learning_rate=0.001 max_depth=8 |
accuracy=0.6228070175438597 f1_score=0.7675675675675676 precision_score=0.6228070175438597 recall_score=1.0 |
|
| 9 | May 08 10:37:22 | completed | trainer-train | n_estimators=1000 learning_rate=0.1 max_depth=8 |
accuracy=0.9385964912280702 f1_score=0.951048951048951 precision_score=0.9444444444444444 recall_score=0.9577464788732394 |
|
| 8 | May 08 10:37:20 | completed | trainer-train | n_estimators=100 learning_rate=0.1 max_depth=8 |
accuracy=0.9473684210526315 f1_score=0.9577464788732394 precision_score=0.9577464788732394 recall_score=0.9577464788732394 |
|
| 7 | May 08 10:37:17 | completed | trainer-train | n_estimators=10 learning_rate=0.1 max_depth=8 |
accuracy=0.9385964912280702 f1_score=0.951048951048951 precision_score=0.9444444444444444 recall_score=0.9577464788732394 |
|
| 6 | May 08 10:37:08 | completed | trainer-train | n_estimators=1000 learning_rate=0.001 max_depth=2 |
accuracy=0.956140350877193 f1_score=0.965034965034965 precision_score=0.9583333333333334 recall_score=0.971830985915493 |
|
| 5 | May 08 10:37:06 | completed | trainer-train | n_estimators=100 learning_rate=0.001 max_depth=2 |
accuracy=0.6228070175438597 f1_score=0.7675675675675676 precision_score=0.6228070175438597 recall_score=1.0 |
|
| 4 | May 08 10:37:04 | completed | trainer-train | n_estimators=10 learning_rate=0.001 max_depth=2 |
accuracy=0.6228070175438597 f1_score=0.7675675675675676 precision_score=0.6228070175438597 recall_score=1.0 |
|
| 3 | May 08 10:36:59 | completed | trainer-train | n_estimators=1000 learning_rate=0.1 max_depth=2 |
accuracy=0.9649122807017544 f1_score=0.9722222222222222 precision_score=0.958904109589041 recall_score=0.9859154929577465 |
|
| 2 | May 08 10:36:56 | completed | trainer-train | n_estimators=100 learning_rate=0.1 max_depth=2 |
accuracy=0.956140350877193 f1_score=0.965034965034965 precision_score=0.9583333333333334 recall_score=0.971830985915493 |
|
| 1 | May 08 10:36:54 | completed | trainer-train | n_estimators=10 learning_rate=0.1 max_depth=2 |
accuracy=0.956140350877193 f1_score=0.965034965034965 precision_score=0.9583333333333334 recall_score=0.971830985915493 |
|
| 1 | May 08 10:36:53 | completed | trainer-train | n_estimators=10 learning_rate=0.1 max_depth=2 |
accuracy=0.956140350877193 f1_score=0.965034965034965 precision_score=0.9583333333333334 recall_score=0.971830985915493 |
|
| 2 | May 08 10:36:53 | completed | trainer-train | n_estimators=100 learning_rate=0.1 max_depth=2 |
accuracy=0.956140350877193 f1_score=0.965034965034965 precision_score=0.9583333333333334 recall_score=0.971830985915493 |
|
| 3 | May 08 10:36:53 | completed | trainer-train | n_estimators=1000 learning_rate=0.1 max_depth=2 |
accuracy=0.9649122807017544 f1_score=0.9722222222222222 precision_score=0.958904109589041 recall_score=0.9859154929577465 |
|
| 4 | May 08 10:36:53 | completed | trainer-train | n_estimators=10 learning_rate=0.001 max_depth=2 |
accuracy=0.6228070175438597 f1_score=0.7675675675675676 precision_score=0.6228070175438597 recall_score=1.0 |
|
| 5 | May 08 10:36:53 | completed | trainer-train | n_estimators=100 learning_rate=0.001 max_depth=2 |
accuracy=0.6228070175438597 f1_score=0.7675675675675676 precision_score=0.6228070175438597 recall_score=1.0 |
|
| 6 | May 08 10:36:53 | completed | trainer-train | n_estimators=1000 learning_rate=0.001 max_depth=2 |
accuracy=0.956140350877193 f1_score=0.965034965034965 precision_score=0.9583333333333334 recall_score=0.971830985915493 |
|
| 7 | May 08 10:36:53 | completed | trainer-train | n_estimators=10 learning_rate=0.1 max_depth=8 |
accuracy=0.9385964912280702 f1_score=0.951048951048951 precision_score=0.9444444444444444 recall_score=0.9577464788732394 |
|
| 8 | May 08 10:36:53 | completed | trainer-train | n_estimators=100 learning_rate=0.1 max_depth=8 |
accuracy=0.9473684210526315 f1_score=0.9577464788732394 precision_score=0.9577464788732394 recall_score=0.9577464788732394 |
|
| 9 | May 08 10:36:53 | completed | trainer-train | n_estimators=1000 learning_rate=0.1 max_depth=8 |
accuracy=0.9385964912280702 f1_score=0.951048951048951 precision_score=0.9444444444444444 recall_score=0.9577464788732394 |
|
| 10 | May 08 10:36:53 | completed | trainer-train | n_estimators=10 learning_rate=0.001 max_depth=8 |
accuracy=0.6228070175438597 f1_score=0.7675675675675676 precision_score=0.6228070175438597 recall_score=1.0 |
|
| 11 | May 08 10:36:53 | completed | trainer-train | n_estimators=100 learning_rate=0.001 max_depth=8 |
accuracy=0.6228070175438597 f1_score=0.7675675675675676 precision_score=0.6228070175438597 recall_score=1.0 |
|
| 12 | May 08 10:36:53 | completed | trainer-train | n_estimators=1000 learning_rate=0.001 max_depth=8 |
accuracy=0.9385964912280702 f1_score=0.951048951048951 precision_score=0.9444444444444444 recall_score=0.9577464788732394 |
|
| 0 | May 08 10:36:44 | completed | trainer-train | n_estimators=100 learning_rate=0.1 max_depth=3 |
accuracy=0.956140350877193 f1_score=0.965034965034965 precision_score=0.9583333333333334 recall_score=0.971830985915493 |
Build, test and deploy Model serving functions#
MLRun serving can produce managed, real-time, serverless, pipelines composed of various data processing and ML tasks. The pipelines use the Nuclio real-time serverless engine, which can be deployed anywhere. For more details and examples, see the MLRun Serving Graphs.
Create a model serving function from our code (view)
serving_fn = mlrun.code_to_function("serving", filename="serving.py", image="mlrun/mlrun", kind="serving")
Adding a model to it:
serving_fn.add_model('cancer-classifier',model_path=hp_tuning_run.outputs["model"], class_name='ClassifierModel')
<mlrun.serving.states.TaskStep at 0x7f8497819b10>
# plot the serving graph topology
serving_fn.spec.graph.plot()

Simulating the model server locally:
# create a mock (simulator of the real-time function)
server = serving_fn.to_mock_server()
> 2022-05-08 10:37:51,652 [info] model cancer-classifier was loaded
> 2022-05-08 10:37:51,653 [info] Loaded ['cancer-classifier']
Test the mock model server endpoint:
List the served models
server.test("/v2/models/", method="GET")
{'models': ['cancer-classifier']}
Infer using test data
my_data = {
"inputs":[
[
1.371e+01, 2.083e+01, 9.020e+01, 5.779e+02, 1.189e-01, 1.645e-01,
9.366e-02, 5.985e-02, 2.196e-01, 7.451e-02, 5.835e-01, 1.377e+00,
3.856e+00, 5.096e+01, 8.805e-03, 3.029e-02, 2.488e-02, 1.448e-02,
1.486e-02, 5.412e-03, 1.706e+01, 2.814e+01, 1.106e+02, 8.970e+02,
1.654e-01, 3.682e-01, 2.678e-01, 1.556e-01, 3.196e-01, 1.151e-01
],
[
1.308e+01, 1.571e+01, 8.563e+01, 5.200e+02, 1.075e-01, 1.270e-01,
4.568e-02, 3.110e-02, 1.967e-01, 6.811e-02, 1.852e-01, 7.477e-01,
1.383e+00, 1.467e+01, 4.097e-03, 1.898e-02, 1.698e-02, 6.490e-03,
1.678e-02, 2.425e-03, 1.450e+01, 2.049e+01, 9.609e+01, 6.305e+02,
1.312e-01, 2.776e-01, 1.890e-01, 7.283e-02, 3.184e-01, 8.183e-02]
]
}
server.test("/v2/models/cancer-classifier/infer", body=my_data)
/User/.pythonlibs/jupyter/lib/python3.7/site-packages/sklearn/base.py:451: UserWarning:
X does not have valid feature names, but GradientBoostingClassifier was fitted with feature names
{'id': 'bb19e6ac532046feb195f3da6a0b1512',
'model_name': 'cancer-classifier',
'outputs': [0, 1]}
Read the model name, ver and schema (input and output features)
server.test("/v2/models/cancer-classifier/", method="GET")
{'name': 'cancer-classifier',
'version': '',
'inputs': [{'name': 'mean radius', 'value_type': 'float'},
{'name': 'mean texture', 'value_type': 'float'},
{'name': 'mean perimeter', 'value_type': 'float'},
{'name': 'mean area', 'value_type': 'float'},
{'name': 'mean smoothness', 'value_type': 'float'},
{'name': 'mean compactness', 'value_type': 'float'},
{'name': 'mean concavity', 'value_type': 'float'},
{'name': 'mean concave points', 'value_type': 'float'},
{'name': 'mean symmetry', 'value_type': 'float'},
{'name': 'mean fractal dimension', 'value_type': 'float'},
{'name': 'radius error', 'value_type': 'float'},
{'name': 'texture error', 'value_type': 'float'},
{'name': 'perimeter error', 'value_type': 'float'},
{'name': 'area error', 'value_type': 'float'},
{'name': 'smoothness error', 'value_type': 'float'},
{'name': 'compactness error', 'value_type': 'float'},
{'name': 'concavity error', 'value_type': 'float'},
{'name': 'concave points error', 'value_type': 'float'},
{'name': 'symmetry error', 'value_type': 'float'},
{'name': 'fractal dimension error', 'value_type': 'float'},
{'name': 'worst radius', 'value_type': 'float'},
{'name': 'worst texture', 'value_type': 'float'},
{'name': 'worst perimeter', 'value_type': 'float'},
{'name': 'worst area', 'value_type': 'float'},
{'name': 'worst smoothness', 'value_type': 'float'},
{'name': 'worst compactness', 'value_type': 'float'},
{'name': 'worst concavity', 'value_type': 'float'},
{'name': 'worst concave points', 'value_type': 'float'},
{'name': 'worst symmetry', 'value_type': 'float'},
{'name': 'worst fractal dimension', 'value_type': 'float'},
{'name': 'label', 'value_type': 'int'}],
'outputs': []}
Deploy a real-time serving function (over Kubernetes or Docker):
Use the mlrun deploy_function() method to build and deploy a Nuclio serving function from your serving-function code.
You can deploy the function object (serving_fn) or reference pre-registered project functions.
This section requires Nuclio to be installed (over k8s or Docker) !
mlrun.deploy_function(serving_fn)
> 2022-05-08 11:03:26,012 [info] Starting remote function deploy
2022-05-08 11:03:27 (info) Deploying function
2022-05-08 11:03:27 (info) Building
2022-05-08 11:03:27 (info) Staging files and preparing base images
2022-05-08 11:03:27 (info) Building processor image
2022-05-08 11:03:30 (info) Build complete
2022-05-08 11:03:39 (info) Function deploy complete
> 2022-05-08 11:03:39,244 [info] successfully deployed function: {'internal_invocation_urls': ['nuclio-breast-cancer-admin-serving.default-tenant.svc.cluster.local:8080'], 'external_invocation_urls': ['breast-cancer-admin-serving-breast-cancer-admin.default-tenant.app.yh41.iguazio-cd1.com/']}
DeployStatus(state=ready, outputs={'endpoint': 'http://breast-cancer-admin-serving-breast-cancer-admin.default-tenant.app.yh41.iguazio-cd1.com/', 'name': 'breast-cancer-admin-serving'})
Test the live endpoint
serving_fn.invoke("/v2/models/cancer-classifier/infer", body=my_data)
> 2022-05-08 11:04:36,869 [info] invoking function: {'method': 'POST', 'path': 'http://nuclio-breast-cancer-admin-serving.default-tenant.svc.cluster.local:8080/v2/models/cancer-classifier/infer'}
{'id': '774e99f5-56ef-4b64-9675-7b9784d74a46',
'model_name': 'cancer-classifier',
'outputs': [0, 1]}
Build and run automated ML pipelines and CI/CD#
You can easily compose a workflow (see workflow.py (view) (download)) from your functions that automatically prepares data, trains, tests, and deploys the model - every time you change the code or data, or need a refresh. See Project workflows and automation for details.
Using the SDK:
# run the workflow
run_id = project.run(
workflow_path="./workflow.py",
arguments={"model_name": "breast_cancer_classifier"},
watch=True, local=no_k8s)

Run Results
Workflow e6802b66-95ba-4624-9434-3b1bcb0bc003 finished, state=Succeededclick the hyper links below to see detailed results
| uid | start | state | name | parameters | results |
|---|---|---|---|---|---|
| May 08 11:05:09 | completed | trainer | accuracy=0.956140350877193 f1_score=0.965034965034965 precision_score=0.9583333333333334 recall_score=0.971830985915493 |
||
| May 08 11:04:55 | completed | get-data | format=pq model_name=breast_cancer_classifier |
label_column=label |
View the pipeline in MLRun UI:

Using the CLI:
With MLRun you can use a single command to load the code from local dir or remote archive (Git, zip, …) and execute a pipeline. This can be very useful for integration with CI/CD frameworks and practices. See Github/Gitlab and CI/CD integration for more details.
The following command loads the project from the current dir (.) and executes the workflow with an argument, for running locally (without k8s).
!mlrun project -r ./workflow.py -w -a model_name=classifier2 .
Loading project breast-cancer-admin into .:
kind: project
metadata:
name: breast-cancer-admin
spec:
functions:
- url: gen_breast_cancer.py
name: gen-breast-cancer
image: mlrun/mlrun
- url: trainer.py
name: trainer
image: mlrun/mlrun
handler: train
- url: serving.py
name: serving
kind: serving
image: mlrun/mlrun
workflows: []
artifacts: []
source: git://github.com/yaronha/tutorial.git#refs/heads/main
subpath: ''
origin_url: git://github.com/yaronha/tutorial.git#refs/heads/main
desired_state: online
disable_auto_mount: false
running workflow None file: ./workflow.py
> 2022-04-28 16:52:31,128 [warning] WARNING!, you seem to have uncommitted git changes, use .push()
> 2022-04-28 16:52:32,113 [info] submitted pipeline breast-cancer-admin 2022-04-28 16-52-31 id=f1af653c-6a4f-4478-8bec-68e5cba1bfa2
> 2022-04-28 16:52:32,113 [info] Pipeline run id=f1af653c-6a4f-4478-8bec-68e5cba1bfa2, check UI for progress
Pipeline started in project breast-cancer-admin id=f1af653c-6a4f-4478-8bec-68e5cba1bfa2, check progress in https://dashboard.default-tenant.app.yh41.iguazio-cd1.com/mlprojects/breast-cancer-admin/jobs/monitor-workflows/workflow/f1af653c-6a4f-4478-8bec-68e5cba1bfa2
run id: f1af653c-6a4f-4478-8bec-68e5cba1bfa2
> 2022-04-28 16:52:32,113 [info] waiting for pipeline run completion
Workflow f1af653c-6a4f-4478-8bec-68e5cba1bfa2 finished, state=Succeeded
status name uid results
--------- -------- -------- -----------------------------------------------------------------------------------------------------------------------
completed trainer ..427352 accuracy=0.956140350877193,f1_score=0.965034965034965,precision_score=0.9583333333333334,recall_score=0.971830985915493
completed get-data ..e90664 label_column=label
What’s Next - Check MLRun Docs and try:#
Use MLRun Feature-store to generate offline and real-time features from operational data
Track and retrain models with MLRun Model Monitoring