
Quick-Start Guide
MLRun is an end-to-end open-source MLOps solution to manage and automate your analytics and machine learning lifecycle, from data ingestion, through model development and full pipeline/model deployment, to model monitoring. Its primary goal is to ease the development of machine learning pipeline at scale and help organizations build a robust process for moving from the research phase to fully operational production deployments.
MLRun is automating the process of moving code to production by implementing a serverless approach, where different tasks or services are executed over elastic serverless functions (read more about MLRun functions), in this quick start guide we will use existing (marketplace) functions, see the tutorial with more detailed example of how to create and use functions.
Table of Contents
Working with MLRun
If you need to install MLRun, refer to the Installation Guide.
Note: If you are using the Iguazio MLOps Platform, MLRun already comes preinstalled and integrated in your system.
If you are not viewing this quick-start guide from a Jupyter Lab instance, open it on your cluster, create a new notebook, and copy the sections below to the notebook to run them.
Set Environment
Before you begin, initialize MLRun by calling set_environment and provide it with the project name. All the work will be saved and tracked under that project.
import mlrun

project = mlrun.new_project('quick-start', user_project=True)
Train a Model
MLRun introduces the concept of functions. You can run your own code in functions, or use functions from the function marketplace. Functions can run locally or over elastic “serverless” engines (as containers over kubernetes).
In the example below, you’ll use the sklearn_classifier
from MLRun function marketplace to train a model and use a sample dataset
(CSV file) as the input. You can read more on how to use data items from different data sources
or from the Feature Store.
Note: When training a model in an air-gapped site
If you are working in MLRun:
Download your data file and save it locally.
Run:
import osos.environ["env_name"] = 1Use the same command for the sample data set path, for example:
source_url = mlrun.get_sample_path("data/iris/iris_dataset.csv")If your system is integrated with an MLOps Platform:
Download your data file and save it locally.
In the UI, click the settings icon (
) in the top-right of the header in any page to open the Settings dialog.
Click Environment variables | Create a new environment variable, and set an environmental variable: SAMPLE_DATA_SOURCE_URL_PREFIX = the relative path to locally-stored data. For example:
/v3io/bigdata/path/...Use the same command for the sample data set path, for example:
source_url = mlrun.get_sample_path("data/iris/iris_dataset.csv")
# import the training function from the marketplace (hub://)
train = mlrun.import_function('hub://sklearn_classifier')

# Get a sample dataset path (points to MLRun data samples repository)
source_url = mlrun.get_sample_path("data/iris/iris_dataset.csv")

# run the function and specify input dataset path and some parameters (algorithm and label column name)
train_run = train.run(name='train',
                      inputs={'dataset': source_url},
                      params={'model_pkg_class': 'sklearn.linear_model.LogisticRegression',
                              'label_column': 'label'})
> 2022-02-06 21:42:08,132 [info] starting run train uid=d0dd1b8a252e435b8a84c1ae8206918a DB=http://mlrun-api:8080
> 2022-02-06 21:42:08,302 [info] Job is running in the background, pod: train-wmwxv
> 2022-02-06 21:42:11,353 [warning] Server or client version is unstable. Assuming compatible: {'server_version': '0.0.0+unstable', 'client_version': '0.0.0+unstable'}
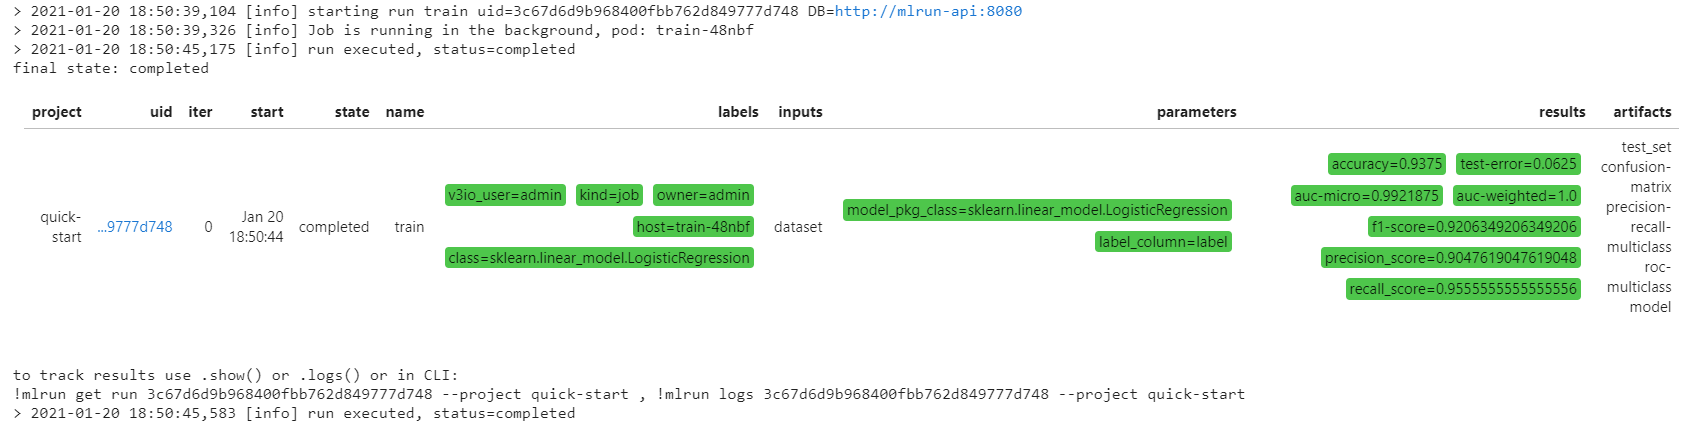
> 2022-02-06 21:42:14,612 [info] run executed, status=completed
final state: completed
| project | uid | iter | start | state | name | labels | inputs | parameters | results | artifacts |
|---|---|---|---|---|---|---|---|---|---|---|
| quick-start-admin | 0 | Feb 06 21:42:13 | completed | train | v3io_user=admin kind=job owner=admin host=train-wmwxv class=sklearn.linear_model.LogisticRegression |
dataset |
model_pkg_class=sklearn.linear_model.LogisticRegression label_column=label |
accuracy=0.9375 test-error=0.0625 auc-micro=0.9921875 auc-weighted=1.0 f1-score=0.9206349206349206 precision_score=0.9047619047619048 recall_score=0.9555555555555556 |
test_set confusion-matrix precision-recall-multiclass roc-multiclass model |
> 2022-02-06 21:42:17,636 [info] run executed, status=completed
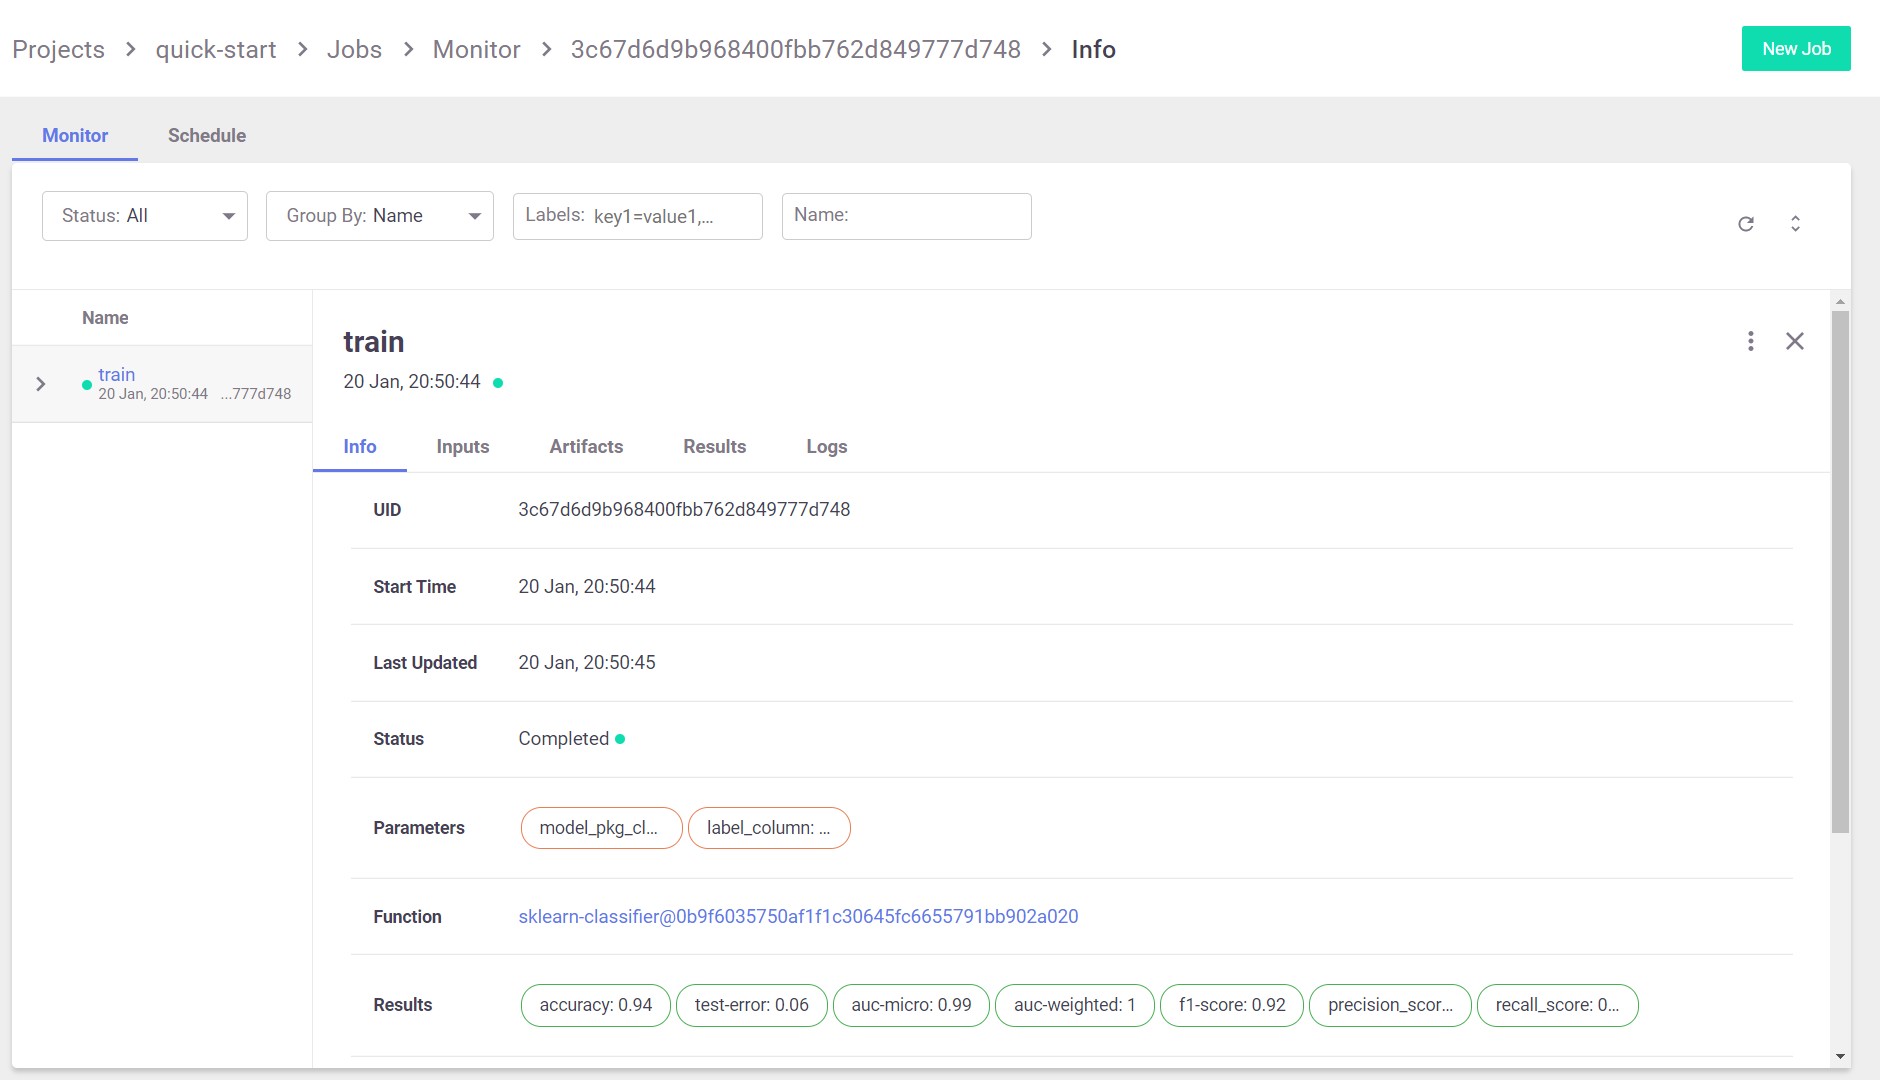
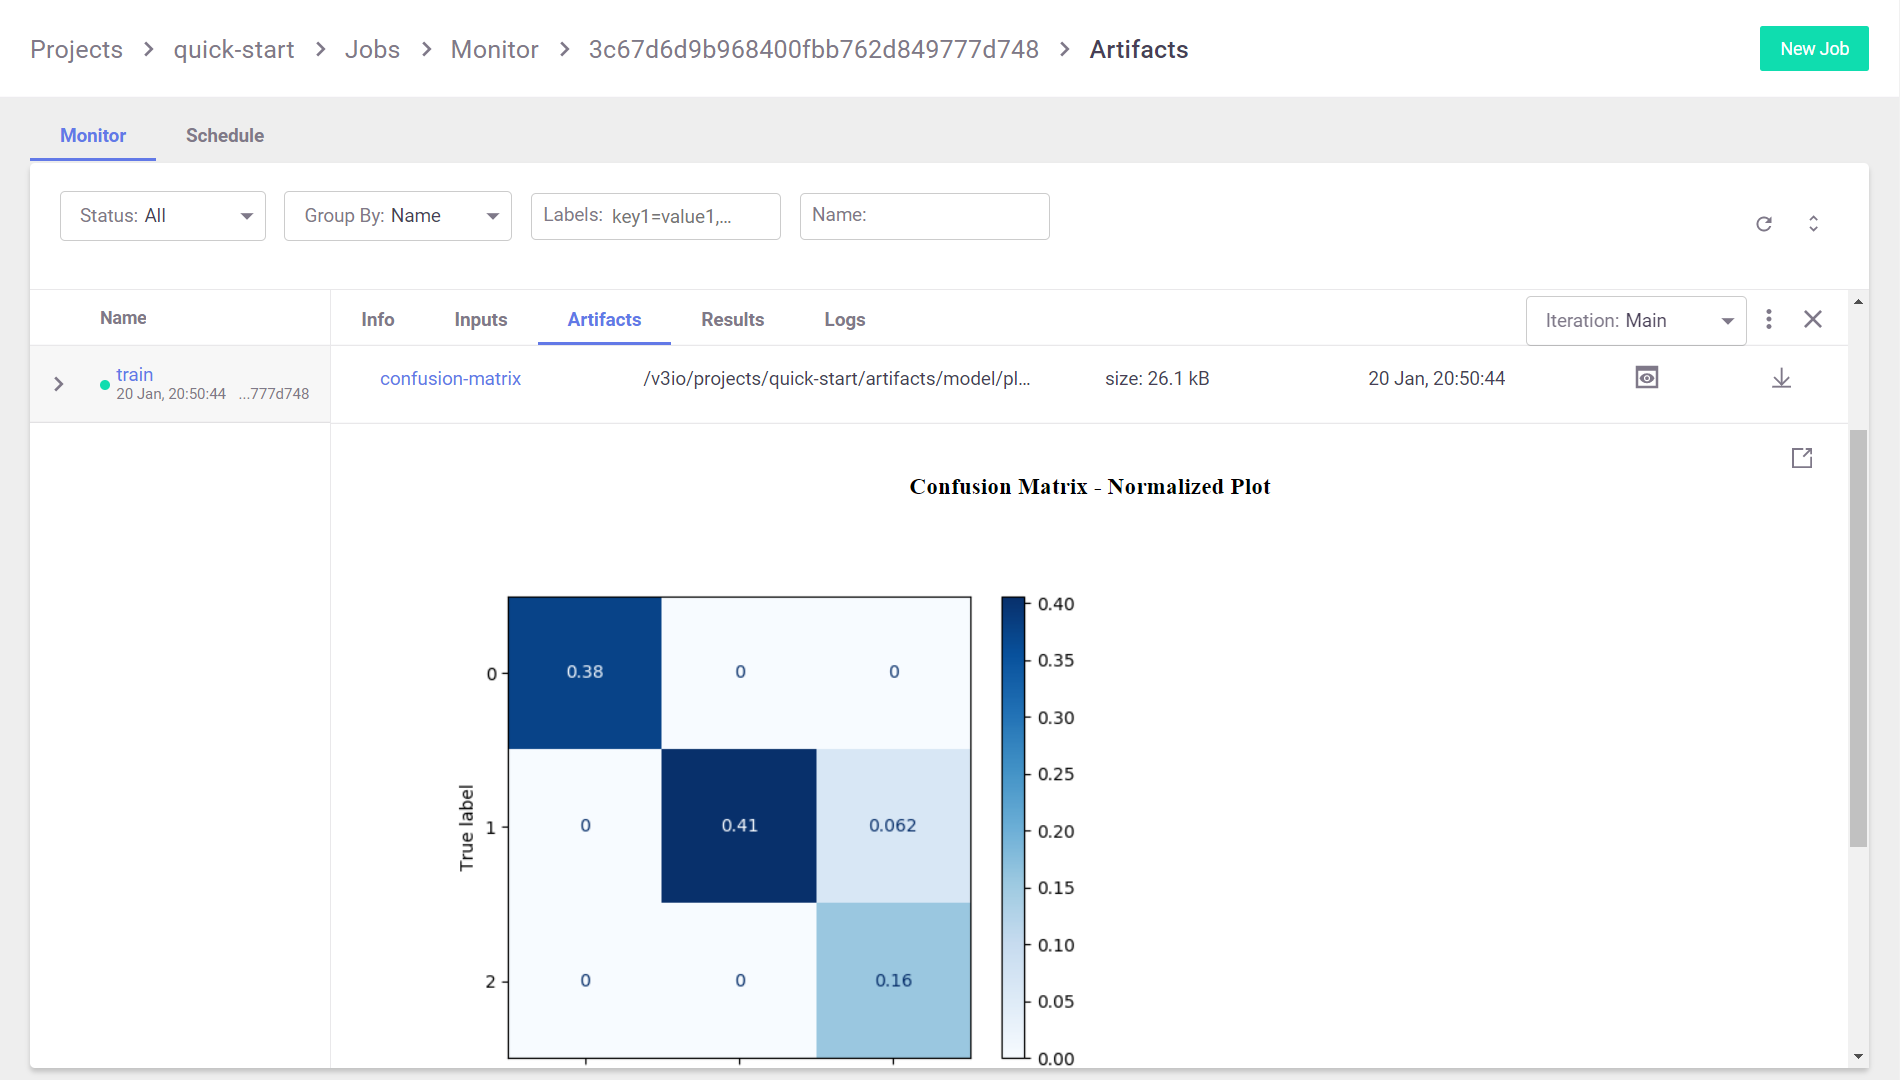
The run output above contains a link to the MLRun UI. Click it to inspect the various aspects of the jobs you run:
As well as their artifacts:
When running the function in a Jupyter notebook, the output cell for your function execution contains a table with run information — including the state of the execution, all inputs and parameters, and the execution results and artifacts.
Test the Model
Now that you have a trained model, you can test it: run a task that uses the test_classifier
function from the function marketplace to run the selected trained model against the test dataset. The test dataset
was returned from the training task (train_run) in the previous step.
test = mlrun.import_function('hub://test_classifier')
You can then run the function as part of your project, just as any other function that you have written yourself.
To view the function documentation, call the doc method:
test.doc()
function: test-classifier
test a classifier using held-out or new data
default handler: test_classifier
entry points:
  test_classifier: Test one or more classifier models against held-out dataset

Using held-out test features, evaluates the peformance of the estimated model

Can be part of a kubeflow pipeline as a test step that is run post EDA and
training/validation cycles
    context  - the function context, default=
    models_path(DataItem)  - artifact models representing a file or a folder, default=
    test_set(DataItem)  - test features and labels, default=
    label_column(str)  - column name for ground truth labels, default=
    score_method(str)  - for multiclass classification, default=micro
    plots_dest(str)  - dir for test plots, default=
    model_evaluator  - NOT IMPLEMENTED: specific method to generate eval, passed in as string or available in this folder, default=None
    default_model(str)  - , default=model.pkl
    predictions_column(str)  - column name for the predictions column on the resulted artifact, default=yscore
    model_update  - (True) update model, when running as stand alone no need in update, default=True
Configure parameters for the test function (params), and provide the selected trained model from the train task as an input artifact (inputs)
test_run = test.run(name="test",
                    params={"label_column": "label"},
                    inputs={"models_path": train_run.outputs['model'],
                            "test_set": train_run.outputs['test_set']})
> 2022-02-06 21:42:30,469 [info] starting run test uid=de5736813f13448789526b8793b34700 DB=http://mlrun-api:8080
> 2022-02-06 21:42:30,612 [info] Job is running in the background, pod: test-l4rjd
> 2022-02-06 21:42:33,761 [warning] Server or client version is unstable. Assuming compatible: {'server_version': '0.0.0+unstable', 'client_version': '0.0.0+unstable'}
> 2022-02-06 21:42:35,972 [info] run executed, status=completed
final state: completed
| project | uid | iter | start | state | name | labels | inputs | parameters | results | artifacts |
|---|---|---|---|---|---|---|---|---|---|---|
| quick-start-admin | 0 | Feb 06 21:42:35 | completed | test | v3io_user=admin kind=job owner=admin host=test-l4rjd |
models_path test_set |
label_column=label |
accuracy=0.9777777777777777 test-error=0.022222222222222223 auc-micro=0.9985185185185185 auc-weighted=0.9985392720306513 f1-score=0.9769016328156113 precision_score=0.9761904761904763 recall_score=0.9791666666666666 |
confusion-matrix precision-recall-multiclass roc-multiclass test_set_preds |
> 2022-02-06 21:42:36,852 [info] run executed, status=completed
Serve the Model
MLRun serving can take MLRun models or standard model files and produce managed, real-time, serverless functions using the Nuclio real-time serverless framework. Nuclio is built around data, I/O, and compute-intensive workloads, and is focused on performance and flexibility. Nuclio is also deeply integrated into the MLRun framework. See MLRun Serving documentation to learn more about the rich serving capabilities MLRun has to offer.
To deploy your model using the v2_model_server function, run the following code:
serve = mlrun.import_function('hub://v2_model_server')
model_name='iris'
serve.add_model(model_name, model_path=train_run.outputs['model'])
addr = serve.deploy()
> 2022-02-06 21:42:47,287 [info] Starting remote function deploy
2022-02-06 21:42:47  (info) Deploying function
2022-02-06 21:42:47  (info) Building
2022-02-06 21:42:48  (info) Staging files and preparing base images
2022-02-06 21:42:48  (info) Building processor image
2022-02-06 21:42:50  (info) Build complete
2022-02-06 21:42:55  (info) Function deploy complete
> 2022-02-06 21:42:56,081 [info] successfully deployed function: {'internal_invocation_urls': ['nuclio-quick-start-admin-v2-model-server.default-tenant.svc.cluster.local:8080'], 'external_invocation_urls': ['quick-start-admin-v2-model-server-quick-start-admin.default-tenant.app.yh41.iguazio-cd1.com/']}
The invoke method enables to programmatically test the function.
import json

inputs = [[5.1, 3.5, 1.4, 0.2],
          [7.7, 3.8, 6.7, 2.2]]
my_data = json.dumps({'inputs': inputs})
serve.invoke(f'v2/models/{model_name}/infer', my_data)
> 2022-02-06 21:42:58,441 [info] invoking function: {'method': 'POST', 'path': 'http://nuclio-quick-start-admin-v2-model-server.default-tenant.svc.cluster.local:8080/v2/models/iris/infer'}
{'id': 'e0bd75f2-bca4-4dd1-8237-3a101756c95a',
 'model_name': 'iris',
 'outputs': [0, 2]}
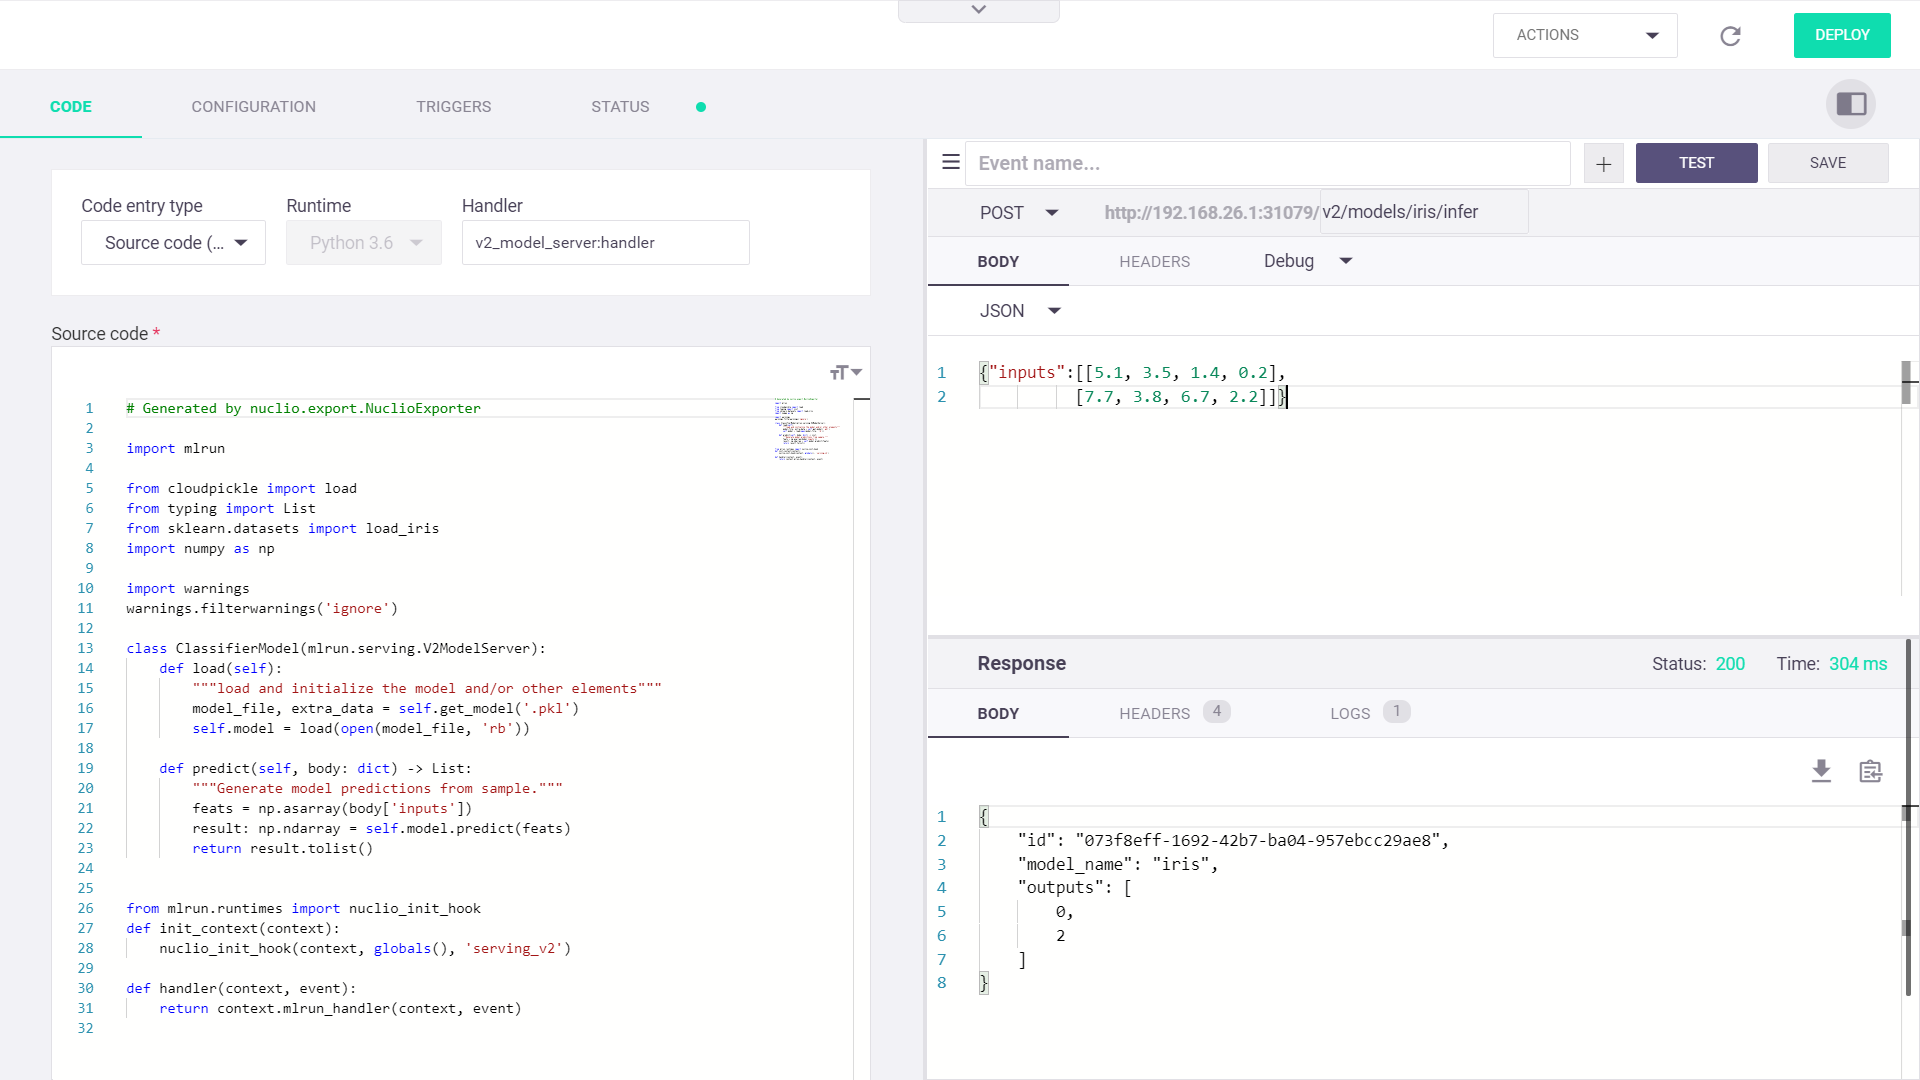
Open the Nuclio UI to view the function and test it.
For a more detailed walk-through, refer to the getting-started tutorial.