Projects and automated ML pipeline#
This notebook demonstrates how to work with projects, source control (git), and automating the ML pipeline.
Make sure you went over the basics in MLRun Quick Start Tutorial.
MLRun Project is a container for all your work on a particular activity: all the associated code, functions, jobs, workflows, data, models, and artifacts. Projects can be mapped to git repositories to enable versioning, collaboration, and CI/CD.
You can create project definitions using the SDK or a yaml file and store those in the MLRun DB, a file, or an archive. Once the project is loaded you can run jobs/workflows that refer to any project element by name, allowing separation between configuration and code. See load projects for details.
Projects contain workflows that execute the registered functions in a sequence/graph (DAG), and that can reference project parameters, secrets and artifacts by name. MLRun currently supports three workflow engines: local (for simple tasks), remote, and kfp Kubeflow Pipelines (for more complex/advanced tasks). MLRun also supports a real-time workflow engine (see online serving pipelines (graphs).
An ML Engineer can gather the different functions created by the data engineer and data scientist and create this automated pipeline.
In this tutorial
MLRun installation and configuration#
Before running this notebook make sure the mlrun packages are installed (pip install mlrun) and that you have configured the access to MLRun service.
# Install MLRun if not installed, run this only once (restart the notebook after the install !!!)
%pip install mlrun
Set up the project and functions#
Get or create a project
There are three ways to create/load MLRun projects:
mlrun.projects.new_project()— Create a new MLRun project and optionally load it from a yaml/zip/git template.mlrun.projects.load_project()— Load a project from a context directory or remote git/zip/tar archive.mlrun.projects.get_or_create_project()— Load a project from the MLRun DB if it exists, or from a specified context/archive.
Projects refer to a context directory that holds all the project code and configuration. Its default value is "./",
which is the directory the MLRun client runs from.
The context dir is
usually mapped to a git repository and/or to an IDE (PyCharm, VSCode, etc.) project.
import mlrun

project = mlrun.get_or_create_project(
    "tutorial", context="./", user_project=True, allow_cross_project=True
)
Register project functions#
To run workflows, you must save the definitions for the functions in the project so that function objects are initialized automatically when you load a project or when running a project version in automated CI/CD workflows. In addition, you might want to set/register other project attributes such as global parameters, secrets, and data.
Functions are registered using the set_function() command, where you can specify the code, requirements, image, etc.
Functions can be created from a single code/notebook file or have access to the entire project context directory. (By adding the with_repo=True flag, it guarantees that the project context is cloned into the function runtime environment).
Function registration examples:
    # Example: register a notebook file as a function
    project.set_function('mynb.ipynb', name='test-function', image="mlrun/mlrun", handler="run_test")

    # Define a job (batch) function that uses code/libs from the project repo
    project.set_function(
        name="myjob", handler="my_module.job_handler",
        image="mlrun/mlrun", kind="job", with_repo=True,
    )
Function code
Run the following cell to generate the data prep file (or copy it manually):
%%writefile src/data-prep.py

import pandas as pd
from sklearn.datasets import load_breast_cancer


def breast_cancer_generator():
    """
    A function that generates the breast cancer dataset
    """
    breast_cancer = load_breast_cancer()
    breast_cancer_dataset = pd.DataFrame(
        data=breast_cancer.data, columns=breast_cancer.feature_names
    )
    breast_cancer_labels = pd.DataFrame(data=breast_cancer.target, columns=["label"])
    breast_cancer_dataset = pd.concat(
        [breast_cancer_dataset, breast_cancer_labels], axis=1
    )

    return breast_cancer_dataset, "label"
Register the function above in the project
data_prep_func = project.set_function(
    "src/data-prep.py",
    name="data-prep",
    kind="job",
    image="mlrun/mlrun",
    handler="breast_cancer_generator",
)
pipeline_serving_func = project.set_function(
    func="",
    name="pipeline-serving",
    image="mlrun/mlrun",
    kind="serving",
)
data_prep_func.save()
pipeline_serving_func.save()
Register additional project objects and metadata
You can define other objects (workflows, artifacts, secrets) and parameters in the project and use them in your functions, for example:
    # Register a simple named artifact in the project (to be used in workflows)
    data_url = 'https://s3.wasabisys.com/iguazio/data/iris/iris.data.raw.csv'
    project.set_artifact('data', target_path=data_url)

    # Add a multi-stage workflow (./workflow.py) to the project with the name 'main' and save the project
    project.set_workflow('main', "./workflow.py")

    # Read env vars from dict or file and set as project secrets
    project.set_secrets({"SECRET1": "value"})
    project.set_secrets(file_path="secrets.env")

    project.spec.params = {"x": 5}
Save the project
project.set_function(f"db://{project.name}/data-prep", name="data-prep")
project.set_function(f"db://{project.name}/pipeline-serving", name="pipeline-serving")
project.set_source(f"db://{project.name}")
# Save the project in the db (and into the project.yaml file)
project.save()
When you save the project it stores the project definitions in the project.yaml. This allows reconstructing the project in a remote cluster or a CI/CD system.
See the generated project file: project.yaml.
Work with GIT and archives#
Push the project code/metadata into an archive#
Use standard git commands to push the current project tree into a git archive. Make sure you .save() the project before pushing it.
git remote add origin <server>
git commit -m "Commit message"
git push origin master
Alternatively, you can use MLRun SDK calls:
project.create_remote(git_uri, branch=branch)— to register the remote Git pathproject.push()— save the project state and commit/push updates to the remote git repo
You can also save the project content and metadata into a local or remote .zip archive, for example:
project.export("../archive1.zip")
project.export("s3://my-bucket/archive1.zip")
project.export(f"v3io://projects/{project.name}/archive1.zip")
Load a project from local/remote archive#
The project metadata and context (code and configuration) can be loaded and initialized using the load_project() method.
When url (of the git/zip/tar) is specified, it clones a remote repo into the local context dir.
# Load the project and run the 'main' workflow
project = load_project(context="./", name="myproj", url="git://github.com/mlrun/project-archive.git")
project.run("main", arguments={'data': data_url})
Projects can also be loaded and executed using the CLI:
mlrun project -n myproj -u "git://github.com/mlrun/project-archive.git" .
mlrun project -r main -w -a data=<data-url> .
# load the project in the current context dir
project = mlrun.load_project("./")
Build and run automated ML pipelines and CI/CD#
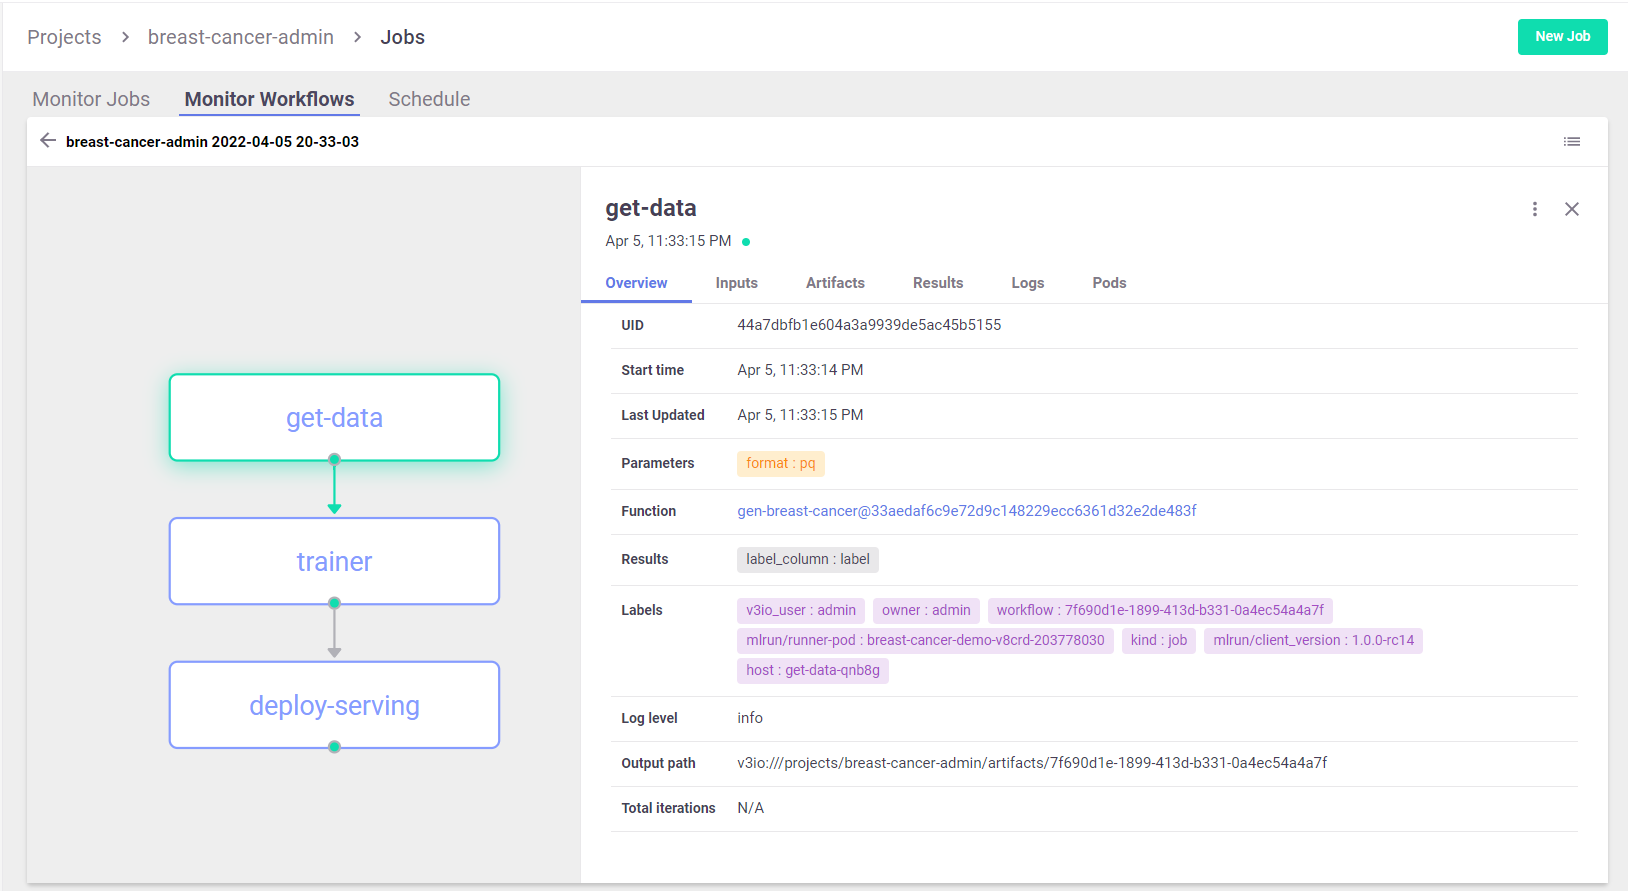
A pipeline is created by running an MLRun "workflow".
The following code defines a workflow and writes it to a file in your local directory, with the file name workflow.py.
The workflow describes a directed acyclic graph (DAG) which is executed using the local, remote, or kubeflow engines.
See running a multi-stage workflow. The defined pipeline includes the following steps:
Generate/prepare the data (
ingest).Train and the model (
train).Deploy the model as a real-time serverless function (
serving).
Note
A pipeline can also include continuous build integration and deployment (CI/CD) steps, such as building container images and deploying models.
%%writefile 'src/workflow.py'

from kfp import dsl
import mlrun

# Create a Kubeflow Pipelines pipeline
@dsl.pipeline(name="breast-cancer-demo")
def pipeline(model_name="cancer-classifier"):
    # Run the ingestion function with the new image and params
    ingest = mlrun.run_function(
        "data-prep",
        name="get-data",
        returns=["dataset", "label_column"],
    )

    # Train a model using the auto_trainer hub function
    train = mlrun.run_function(
        "hub://auto_trainer",
        inputs={"dataset": ingest.outputs["dataset"]},
        params = {
            "model_class": "sklearn.ensemble.RandomForestClassifier",
            "train_test_split_size": 0.2,
            "label_columns": "label",
            "model_name": model_name,
        },
        handler='train',
        outputs=["model"],
    )

    # Deploy the trained model as a serverless function
    mlrun.deploy_function(
        "pipeline-serving",
        models=[
            {
                "key": model_name,
                "model_path": train.outputs["model"],
                "class_name": 'mlrun.frameworks.sklearn.SKLearnModelServer',
            }
        ],
    )
project.set_workflow(name="main", workflow_path="./src/workflow.py", embed=True)
project.save()
Run the workflow
# Run the workflow
run_id = project.run(
    "main",
    arguments={"model_name": "cancer-classifier"},
    engine="remote",
    watch=True,
)
> 2025-05-18 12:52:08,435 [info] Submitting remote workflow: {"project_name":"tutorial-shapira","schedule":null,"workflow_engine":"kfp"}

> 2025-05-18 12:52:19,173 [info] Started run workflow tutorial-shapira-main with run id = '8902f0f5-b1db-4095-99b8-e86da84857fa' by remote engine
> 2025-05-18 12:52:19,174 [info] Waiting for pipeline run completion: {"project":"tutorial-shapira","run_id":"8902f0f5-b1db-4095-99b8-e86da84857fa"}

Run Results
[info] Workflow 8902f0f5-b1db-4095-99b8-e86da84857fa finished, state=Succeeded
click the hyper links below to see detailed results
| uid | start | end | state | kind | name | parameters | results |
|---|---|---|---|---|---|---|---|
| May 18 12:53:13 | 2025-05-18 12:53:18.616713+00:00 | completed | run | auto-trainer-train | model_class=sklearn.ensemble.RandomForestClassifier train_test_split_size=0.2 label_columns=label model_name=cancer-classifier |
accuracy=0.956140350877193 f1_score=0.9673202614379085 precision_score=0.9487179487179487 recall_score=0.9866666666666667 |
|
| May 18 12:52:38 | 2025-05-18 12:52:41.216559+00:00 | completed | run | get-data | label_column=label |
View the pipeline in MLRun UI
Run workflows using the CLI
With MLRun you can use a single command to load the code from local dir or remote archive (Git, zip, …) and execute a pipeline. This can be very useful for integration with CI/CD frameworks and practices. See CI/CD integration for more details.
The following command loads the project from the current dir (.) and executes the workflow with an argument, for running on k8s.
mlrun project -r ./workflow.py -w -a model_name=classifier2 .
Test the deployed model endpoint#
Now that your model is deployed using the pipeline, you can invoke it as usual:
serving_fn = project.get_function("pipeline-serving")
# Create a mock (simulator of the real-time function)
my_data = {
    "inputs": [
        [
            1.371e01,
            2.083e01,
            9.020e01,
            5.779e02,
            1.189e-01,
            1.645e-01,
            9.366e-02,
            5.985e-02,
            2.196e-01,
            7.451e-02,
            5.835e-01,
            1.377e00,
            3.856e00,
            5.096e01,
            8.805e-03,
            3.029e-02,
            2.488e-02,
            1.448e-02,
            1.486e-02,
            5.412e-03,
            1.706e01,
            2.814e01,
            1.106e02,
            8.970e02,
            1.654e-01,
            3.682e-01,
            2.678e-01,
            1.556e-01,
            3.196e-01,
            1.151e-01,
        ]
    ]
}
serving_fn.invoke("/v2/models/cancer-classifier/infer", body=my_data)
{'id': '68d536ee-c546-41c9-9a98-03cdc0dc78a8',
 'model_name': 'cancer-classifier',
 'outputs': [0],
 'timestamp': '2025-05-18 12:56:19.804983+00:00',
 'model_endpoint_uid': '26b8e62c2fc7434b948c23f43a4abdc3'}
Done!#
Congratulations! You’ve completed Part 4 of the MLRun getting-started tutorial. To continue, proceed to Part 5 Model monitoring.