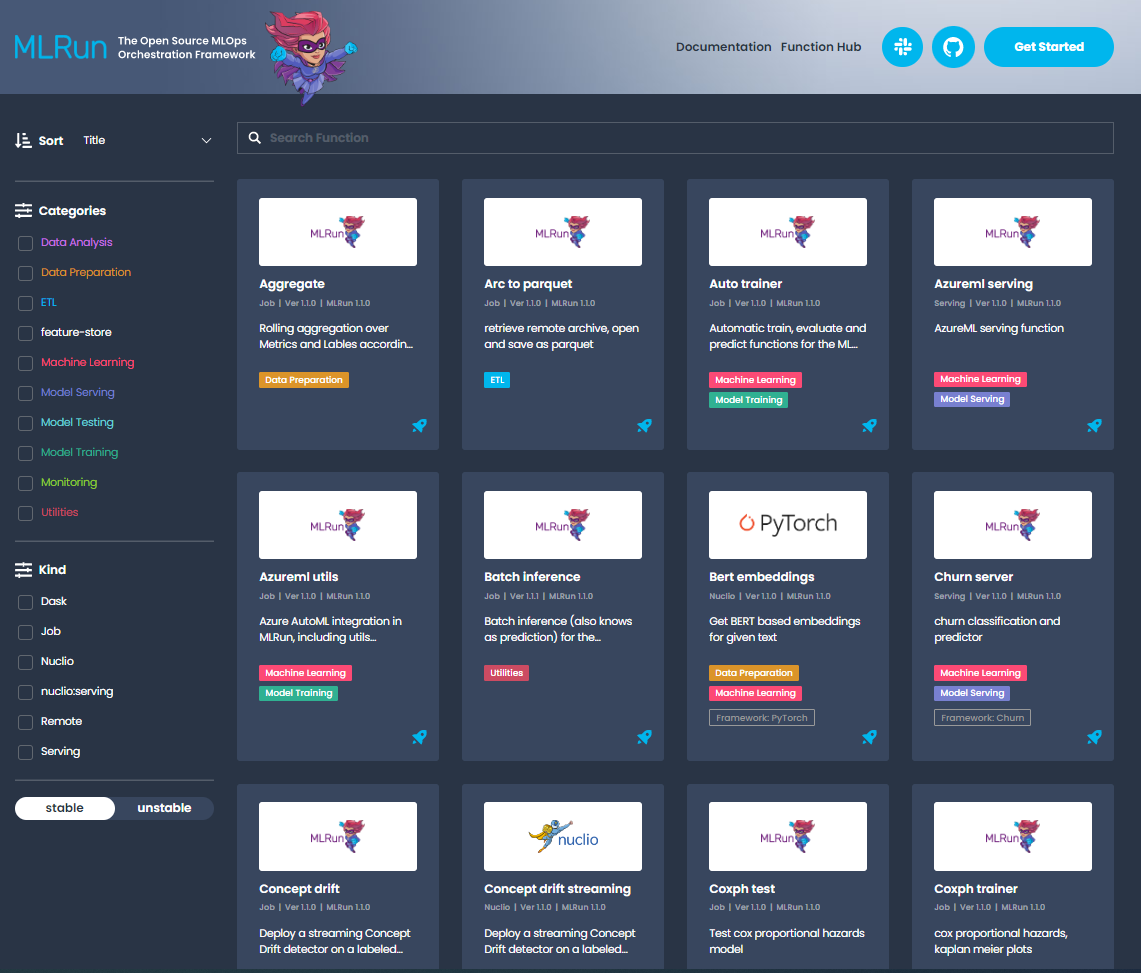
MLRun hub#
The MLRun hub provides a wide range of pre-developed functions and modules for your projects, for a variety of use cases. Reusing built-in code can significantly speed up your development cycle. You can search and filter the categories and kinds to find an item that meets your needs. Every function and module in the hub has complete documentation and examples.
The examples in this page assume that you are working in a project and that all dependencies were already imported.
In this section
Caution
If you use custom hubs: If you don't specify a hub name at all, the algorithm searches for the function in all the hubs, starting with the most recently defined (custom) hub and going backwards in time. The MlRun hub is the last in the search. If you have multiple hubs, best practice is to specify the hub name when importing from any hub.
Functions#
There are functions for ETL, data preparation, training (ML & deep learning), serving, alerts and notifications and more. Each function has a docstring that explains how to use it. The functions are categorized and their associated versions are listed, so you can easily find a suitable function for your needs.
Load a function from the MLRun hub#
There are two ways to import a function from the hub:
import_function(): creates a function object that you can use as relevant, for example running it as a jobset_function(): adds or update a function object to your project
Use import_function#
This example uses the aggregate function, which perform a rolling aggregation of artifacts. This example also adds a custom aggregation function that the aggregate hub function will use when it runs.
# Import the function
aggregate_function = mlrun.import_function("hub://aggregate")
    ```
import numpy as np

# Declare a custom aggregation function
def dist_from_mean(l):
    mean = np.mean(l)
    return abs(list(l)[3] - mean)
Use set_function#
This example runs the describe function. This function analyzes a dataset (in this case it's a csv file) and generates HTML files (e.g. correlation, histogram) and saves them under the artifact path.
# Load the `describe` function from the MLRun hub:
project.set_function("hub://describe", "describe")

# Or load the same function from your [custom hub](#custom-hub):
project.set_function("hub://<hub-name>/describe", "describe")

# Create a function object named, for example, `my_describe`:
my_describe = project.get_function("describe")
View the function parameters#
To view the parameters, run the function with .doc():
my_describe.doc()
    function: describe
    describe and visualizes dataset stats
    default handler: summarize
    entry points:
      summarize: Summarize a table
        context(MLClientCtx)  - the function context, default=
        table(DataItem)  - MLRun input pointing to pandas dataframe (csv/parquet file path), default=
        label_column(str)  - ground truth column label, default=None
        class_labels(List[str])  - label for each class in tables and plots, default=[]
        plot_hist(bool)  - (True) set this to False for large tables, default=True
        plots_dest(str)  - destination folder of summary plots (relative to artifact_path), default=plots
        update_dataset  - when the table is a registered dataset update the charts in-place, default=False
Run the function#
Use the run method to run the function.
When working with functions, pay attention to the following:
Input vs. params — for sending data items to a function, send it via "inputs" and not as params. See Data items.
Working with artifacts — See Artifacts.
Example of running the describe function:
describe_run = describe_func.run(
    name="task-describe",
    handler="analyze",
    inputs={
        "table": os.path.abspath("artifacts/random_dataset.parquet")
    },  # replace it with your dataset path
    params={"label_column": "label"},
    local=True,
)
Example of running the aggregate function:
aggregate_run = aggregate_function.run(
    name="aggregate",
    params={
        "metrics": ["Temperature", "Humidity"],
        "labels": ["Occupancy"],
        "metric_aggs": ["mean", "std", dist_from_mean],
        "label_aggs": ["sum"],
        "window": 5,
        "center": True,
    },
    inputs={"df_artifact": data_path},
    local=True,
)
Steps#
in addition to MLRun's predefined steps, you can import external steps from the MLRun hub, and also import steps you already saved to an external hub. Importing steps simplifies your process by providing a wider range of steps to choose from, for example: guardrails, classifiers, translators, PDF parsers. Steps can be added at any time (not related to a specific release).
SDK#
get_hub_step(): returns a HubStep object containing metadata of the step and downloads the source code file into thelocal_path(by default, the current working directory).
Load a step from the hub#
There are two ways to import a step from the hub:
Use the step as defined in the hub
Add the step to the graph with the hub path, for example:
graph.add_step(class_name="hub://my_step", name="my_hub_step", ..)
Import a step and modify it before using it
Import the step. The
stepsdirectory must be part of the user source archive.
my_step = mlrun.get_hub_step(url="hub://my_hub/my_step:1.0.0", local_path = "./steps")Modify the step code.
Add the step to the graph:
graph.add_step("steps.my_step.MyStep")
See Hub steps for a full example of importing steps into your graph.
Modules#
There are two types of modules: generic and model monitoring application. You can also add modules to your own hub, making them easily accessible for sharing.
The modules are categorized and their associated versions are listed, so you can easily find a suitable module for your needs. Each module in the hub has an accompanying example notebook with complete usage examples.
There are two means of using modules from the hub:
Import a module#
First import the module from the hub, which downloads it to your local file system. For example:
module = mlrun.import_module("hub://my_module")
At this point, you can call the module's functions. For example, if the module has a function named execute, you can run it as follows:
module.execute()
Import a model monitoring application#
Note
Before you import a model monitoring module:
The model monitoring apps provide off-the-shelf monitoring, and save you the time required to develop and test apps. To use a model monitoring module directly in your project without modifying it, the code looks like:
fn = project.set_model_monitoring_function(
    func="hub://count_events",
    application_class="CountApp",
    name="CountEvents",
)
project.deploy_function(fn)
You can also download a model monitoring module and modify it.
First import the module from the hub, which downloads it to your local file system:
count_events_app = mlrun.import_module("hub://count_events")
The module is now available on your filesystem, and you can modify it as needed. For example, you can run the app as a job:
res = count_events_app.CountApp.evaluate(func_path="count_events.py",
    run_local=False,
    sample_data=pd.DataFrame({"col": [1, 2, 3, 4]}),
                                   image=image,
                                  endpoints=["model_0"])
You can also deploy it just like any other custom monitoring application:
fn = project.set_model_monitoring_function(
    func="count_events.py",
    application_class="CountApp",
    name="CountEventsFromFile",
    image=image,
)
project.deploy_function(fn)
View module metadata#
Use get_hub_module to return a HubModule object that provides the metadata of the module and also includes APIs for the module, such as install the relevant requirements or download the files.
get_hub_module retrieves the metadata of the module without downloading it. For example:
# Getting hubmodule metadata
hub_module = mlrun.get_hub_module("hub://histogram_data_drift")
Additional operations:
# print out the details
hub_module.to_dict()

# Download module files into a local directory
hub_module.download_files("./temp")

# Import the module
mod = hub_module.module()
Custom hub#
Alternatively, you can create your own hub, and connect it to MLRun. Then you can import functions (with their tags) from your custom hub.
Create a custom hub#
You can either fork the MLRun hub repo and add to it your Git repo, or create a hub from scratch.
Note
Make sure your hub source is accessible via GitHub (private is also possible).
To create a hub from scratch, the hub structure must be the same as the MLRun hub.
The hierarchy must be:
functions directory
channels directories
some-function-1
some-function-2
…
some-function-n
version-1
…
version-n
latest
src
function.yaml
item.yaml
…
static (optional)
html files
Add a custom hub to the MLRun database#
When you add a hub, you can specify an order number by providing an index. The list order is relevant when importing a function or module if you don't specify the hub: the search starts with the highest numbered hub (1, 2, 3, etc.). This is especially relevant if you have two functions (or modules) with the same name in two hubs.
The MLRun hub is always -1. The options for adding custom hubs are:
0, <0: Adds to the top of the list - >0: Adds according to the order you assign it. For examples, you have HubA with index=1 and HubB with index=2. You add HubC with index=2, you get mlrun hub: -1 hubA: index 1 hubC: index 2 hubB: index 3
Of course, you can always specify the hub name.
To add a hub, run:
import mlrun.common.schemas

# Add a custom hub to the top of the list
private_source = mlrun.common.schemas.IndexedHubSource(
    index=1,
    source=mlrun.common.schemas.HubSource(
        metadata=mlrun.common.schemas.HubObjectMetadata(
            name="my_cool_hub", description="a private hub"
        ),
        spec=mlrun.common.schemas.HubSourceSpec(
            path="https://raw.githubusercontent.com/<github-user>/marketplace/refs/heads/master",  # forked from mlrun hub repo
            channel="master",  # sub-directory in the relevant asset type
        ),
    ),
)

mlrun.get_run_db().create_hub_source(private_source)
To access a function or module directly from your hub, specify its path, for example:
mlrun.import_function("hub://my_cool_hub/describe")
To view your hubs, run:
db.list_hub_sources()
The output is similar to:
[IndexedHubSource(index=1, source=HubSource(kind=HubSource, metadata=HubObjectMetadata(name='testhub', description='a private hub', labels={}, updated=datetime.datetime(2025, 11, 19, 12, 19, 28, 737746, tzinfo=datetime.timezone.utc), created=datetime.datetime(2025, 11, 19, 12, 19, 28, 737746, tzinfo=datetime.timezone.utc)), spec=HubSourceSpec(path='https://raw.githubusercontent.com/GiladShapira94', channel='refs/heads/llm_app', credentials={}, object_type='functions'), status=ObjectStatus(state='created'))),
 IndexedHubSource(index=2, source=HubSource(kind=HubSource, metadata=HubObjectMetadata(name='eyalhub', description='a private hub', labels={}, updated=datetime.datetime(2025, 11, 19, 12, 29, 11, 186130, tzinfo=datetime.timezone.utc), created=datetime.datetime(2025, 11, 19, 12, 29, 11, 186130, tzinfo=datetime.timezone.utc)), spec=HubSourceSpec(path='https://raw.githubusercontent.com/Eyal-Danieli/marketplace', channel='refs/heads/master', credentials={}, object_type='functions'), status=ObjectStatus(state='created'))),
 IndexedHubSource(index=3, source=HubSource(kind=HubSource, metadata=HubObjectMetadata(name='eyalhubv2', description='a private hub', labels={}, updated=datetime.datetime(2025, 11, 19, 12, 30, 5, 274030, tzinfo=datetime.timezone.utc), created=datetime.datetime(2025, 11, 19, 12, 30, 5, 274030, tzinfo=datetime.timezone.utc)), spec=HubSourceSpec(path='https://raw.githubusercontent.com/Eyal-Danieli/marketplace', channel='refs/heads/master', credentials={}, object_type='functions'), status=ObjectStatus(state='created'))),
 IndexedHubSource(index=-1, source=HubSource(kind=HubSource, metadata=HubObjectMetadata(name='default', description='MLRun hub', labels={}, updated=datetime.datetime(2025, 11, 24, 10, 3, 15, 143844, tzinfo=datetime.timezone.utc), created=datetime.datetime(2025, 11, 24, 10, 3, 15, 143844, tzinfo=datetime.timezone.utc)), spec=HubSourceSpec(path='https://mlrun.github.io/marketplace', channel='master', credentials={}), status=ObjectStatus(state='created')))]